
In the following paragraphs, you’re going to learn how to diagnose and fix various speaker-related issues such as rattling and crackling on a Macbook Pro.
⚠️ But before we jump right into it, let me give a little disclaimer:
If you proceed to do anything you read in this article, you do it at your own risk. I’m not taking responsibility for any damage in case you break or damage your computer. I’m just a guy who had the same problem as thousands of others trying to help.
Table of Contents:
1. Troubleshooting Macbook Pro speakers
1.1. Two types of speaker-related issues
1.2. How to tell if my sound issues are software or hardware-related?
1.3. How do I know if my Macbook Pro speakers are blown?
1.4. What causes Macbook Pro speakers to blow?
1.5. How much does it cost to fix Macbook Pro speakers?
2. How to Fix Rattling Speaker on a Macbook Pro
2.1. Fixing rattling Macbook Pro’s speaker – Hardware issue
2.1.1. Turn off one speaker on a MacBook – Temporary fix
2.1.2. Fixing blown speaker on a Macbook Pro with a glue – Cheap DIY fix
2.1.3. Replacing faulty speaker on a MacBook Pro
2.2. Fixing crackling Macbook Pro’s speakers – Software issues
2.2.1. Restart your Mac computer
2.2.2. Update your Mac OS to the latest version
2.2.3. Change the sample rate of your audio device
2.2.4. Quit the Coreaudiod process
2.2.5. Turn off user interface sound effects
2.2.6. Reset NVRAM/PRAM
2.2.7. Keep QuickTime opened
2.2.8. Prevent system overload
2.2.9. Try different application
Troubleshooting MacBook Pro Speakers
Two types of speaker-related issues:
- Hardware-related issues – the most common hardware issue with MacBook Pro speakers is a partial tear in the speaker’s diaphragm, aka a blown speaker.
- Software-related issues – most often caused by either firmware or macOS-related software bugs or other app-specific bugs.
How to tell if my sound issues are software or hardware-related?
In order to resolve audio issues, you must first identify whether there is a problem with your Macbook’s hardware or software.
Hardware
One of the clear indicators of hardware-related problems is that the rattling is present at all times (although in varying degrees depending on the volume and type of audio you are listening to).
Signs of hardware-related speaker issues:
- rattling is audible at all times
- rattling/distortion gets worse with increasing volume
- clarity of the sound gets worse with increasing volume
- in some instances popping sound is audible even with speakers turned-off
Software
In case of software problems, the crackling tends to come and go randomly or is present only when using a specific app.
Signs of software related issues:
- crackling tends to come and go randomly or when changing options in audio MIDI setup
- crackling/popping is also audible in headphones
- while increasing volume crackling gets louder but doesn’t get worse (more pronounced)
How do I know if my Macbook Pro speakers are blown?
One way to determine whether the speakers are blown is to test each speaker separately while playing sound that causes rattling.
You can do so by going to System Preferences -> Sound -> Output tab. Then try to switch the balance slider between the right and left speaker. If one of the speakers is clear and the second is rattling, then you’ll know which one is likely blown.
Once you’ve identified which speaker is damaged, you can remove the back cover of your MacBook Pro, remove the rattling speaker, and visually inspect its diaphragm for any damage.

What causes Macbook Pro speakers to blow?
The most common cause of speakers to blow out is by playing sounds at a high volume for long periods of time.
However, speakers can also fail due to age, especially those constructed from inferior materials. So if you have an older model of a MacBook Pro, such as the 2013 – 2015ish models, the rattling might be caused simply due to the speakers’ deterioration through aging.
How much does it cost to fix Macbook Pro speakers?
If you have an older Macbook Pro, such as the 2013 – 2015 model, the repair cost will be around $300 at an Apple Authorized Service. For the newer models from the years 2016 and up, the cost will be around $600.
However, if you decide to repair it yourself, the replacement speakers will cost you around $25 – $60, depending on the particular model of your Macbook.
⚠️ For devices that are more than seven years old, Apple may refuse to repair them due to a lack of spare parts. For more information, check out the Apple support page.
Where can I buy original (OEM) Apple replacement parts?
⚠️ Apple doesn’t sell original (OEM) spare parts to 3rd party dealers. Only authorized service providers have access to original Apple parts. This means you will most like have to buy non-genuine spare parts, which are generally inferior in quality.
How to Fix Rattling Speaker on a MacBook Pro
In case you were able to determine if the rattle is caused by a hardware or software issue, you can try one of the following steps below to resolve the problem.
Fixing rattling MacBook Pro’s speaker – Hardware issue
There are a couple of ways to deal with a torn speaker on your MacBook Pro. In this section of the article, I describe three possible solutions to deal with this issue.
The most effective and long-lasting solution is to replace the faulty speaker with a replacement speaker. But to be fair, every approach has its PROs and CONs, so make sure to read all of the methods below to make the right decision.
1. Turn off one speaker on a MacBook – Temporary fix
If, for example, your left speaker is faulty, you can turn it off in your macOS system preferences. To do so, go to System Preferences -> Sound -> Output tab and drag the balance slider to either left or right, depending on which speaker you want to disable (to see the screenshot, click here).
This is the easiest fix you can do before deciding whether you want to replace the faulty speaker with a new one or fix it by gluing it.
+ easy and quick fix
– works only if one of the speakers is damaged
– you will lose stereo sound experience
– the volume of a sound won’t be as loud
– to compensate for the muted speaker, you’ll likely play sound at higher volumes, which can speed up your second speaker’s deterioration
2. Fixing blown speaker on a Macbook Pro with a glue – Cheap DIY fix
Another way to fix a rattling speaker is by gluing a tear in a speaker with a highly flexible glue. The one that worked great for me is this specialty glue (amazon link) for shoe repairs. It’s a strong but also flexible glue, which is key since the membrane of a speaker is a vibrating part. Of course, you can use many different brands of glue. Just make sure that it’s flexible when dried.
One thing to be mindful of when choosing this repair method is that it will affect the speaker’s sound quality. Especially the low and mid frequencies won’t be as pronounced as they used to be. In case you are going to repair only one speaker, the difference in the sound quality won’t be as pronounced since the second fully functional speaker will mask the lack of lows of the repaired speaker. However, if you’re about to repair both speakers, then the difference in the sound quality will become much clearer.
+ inexpensive repair
+ if you need to repair only one speaker, this may be the right option
– the glue will affect the loudness and quality of sound of the repaired speaker (especially in low and mid-range frequencies)
– the rattling of a speaker may come back after some time
– from the three described methods, this one is most difficult to do
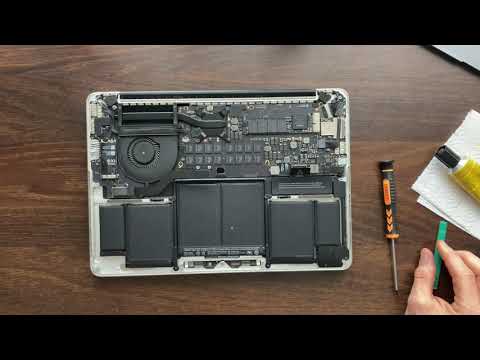
How to fix blown speaker with glue on MacBook Pro:
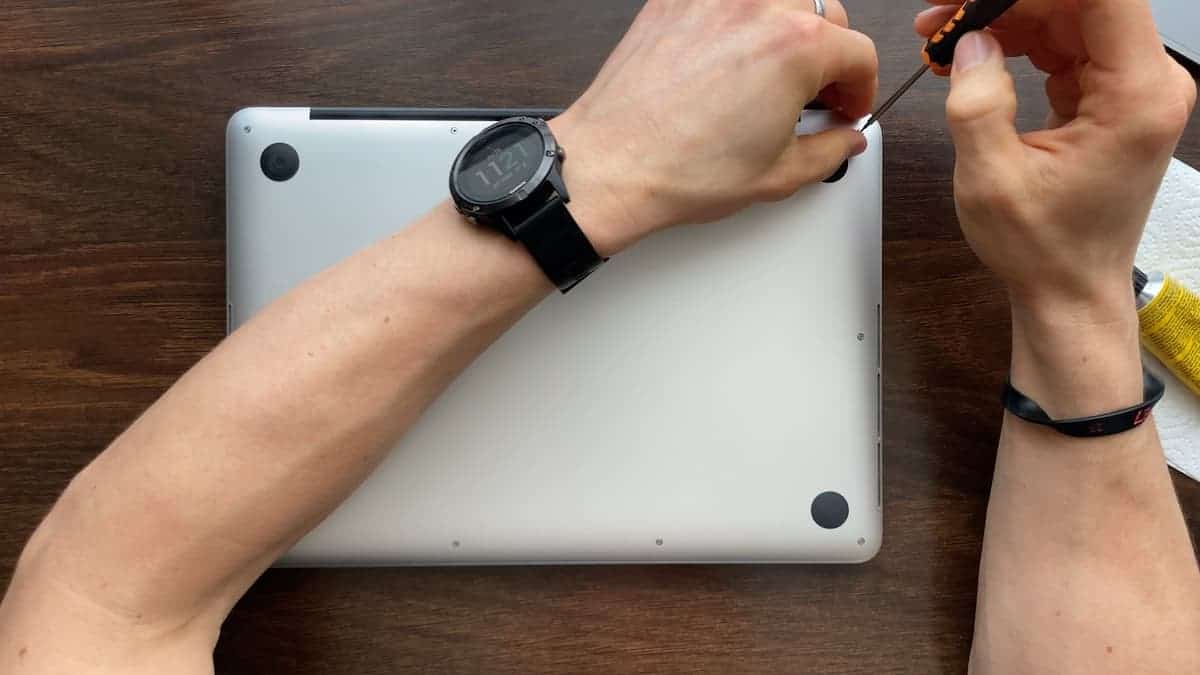
- Unscrew the bottom plate of your Macbook Pro.
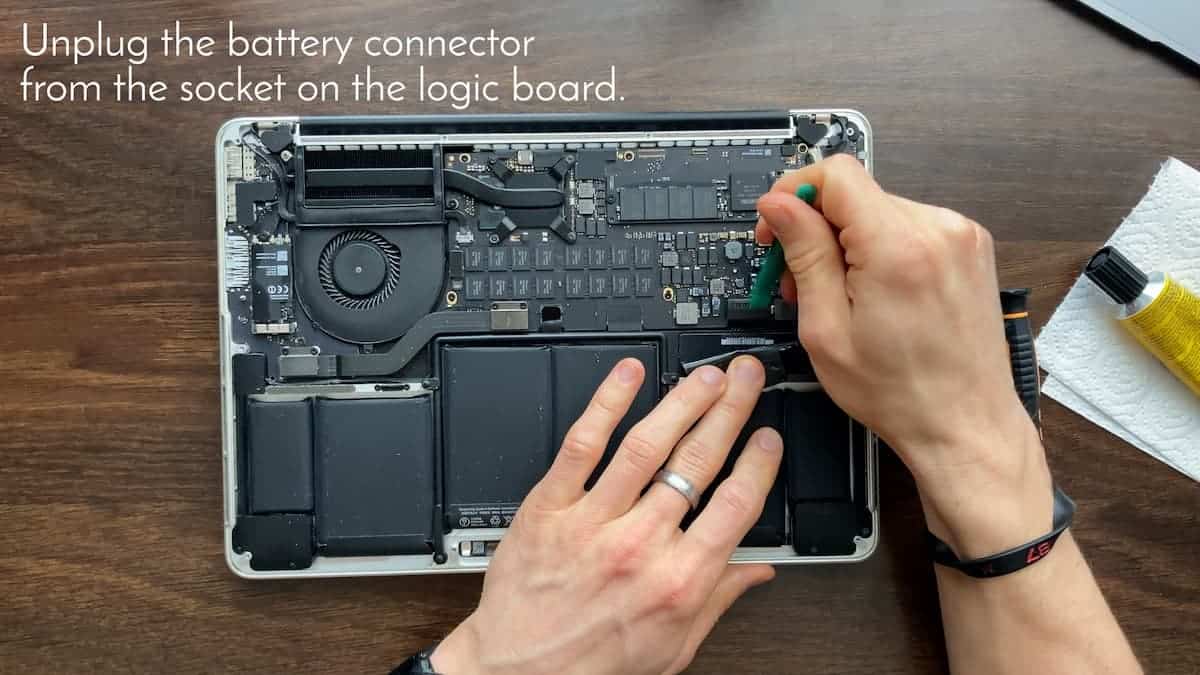
- Unplug the battery connector from the socket on the logic board.
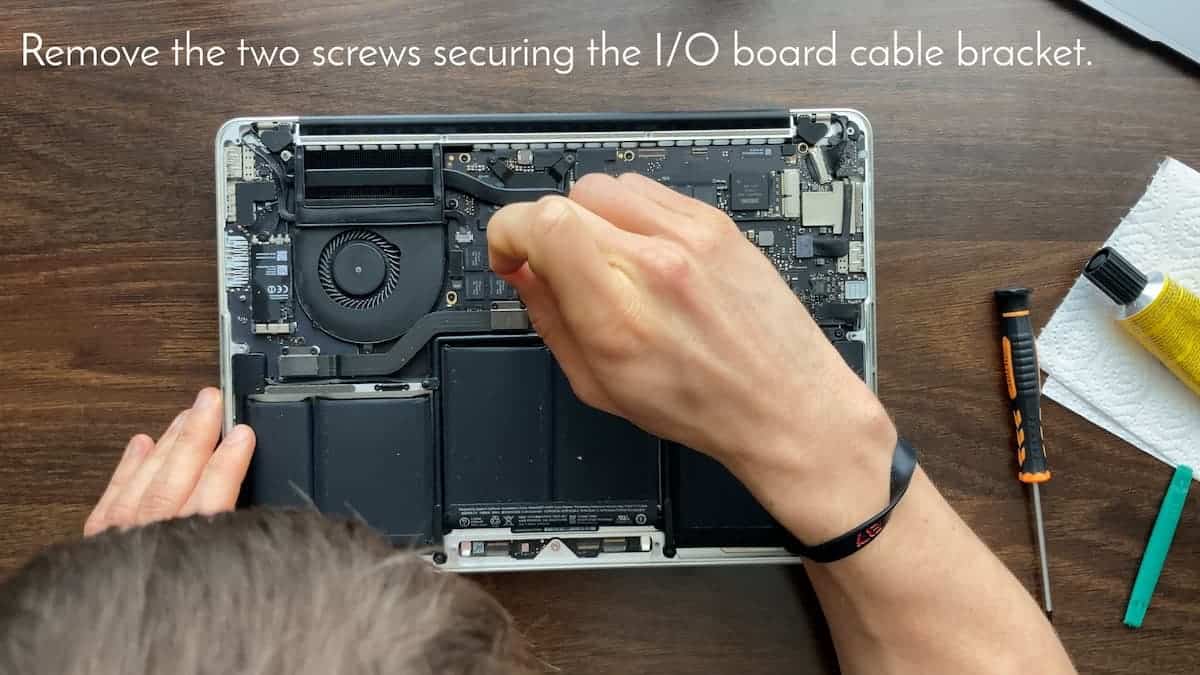
- Remove the two screws securing the I/O board cable bracket. Pop the connector straight up off its socket.
- Carefully tuck the tip of a spudger near the speaker’s connector and pry it up out of its socket.
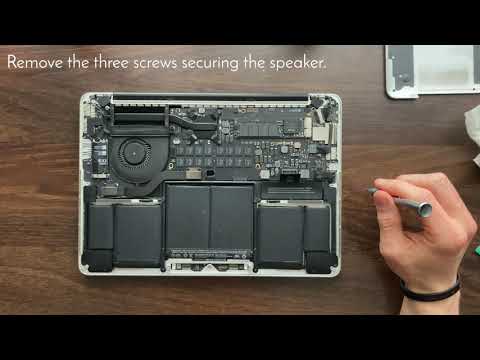
- Remove the three screws securing the speaker.
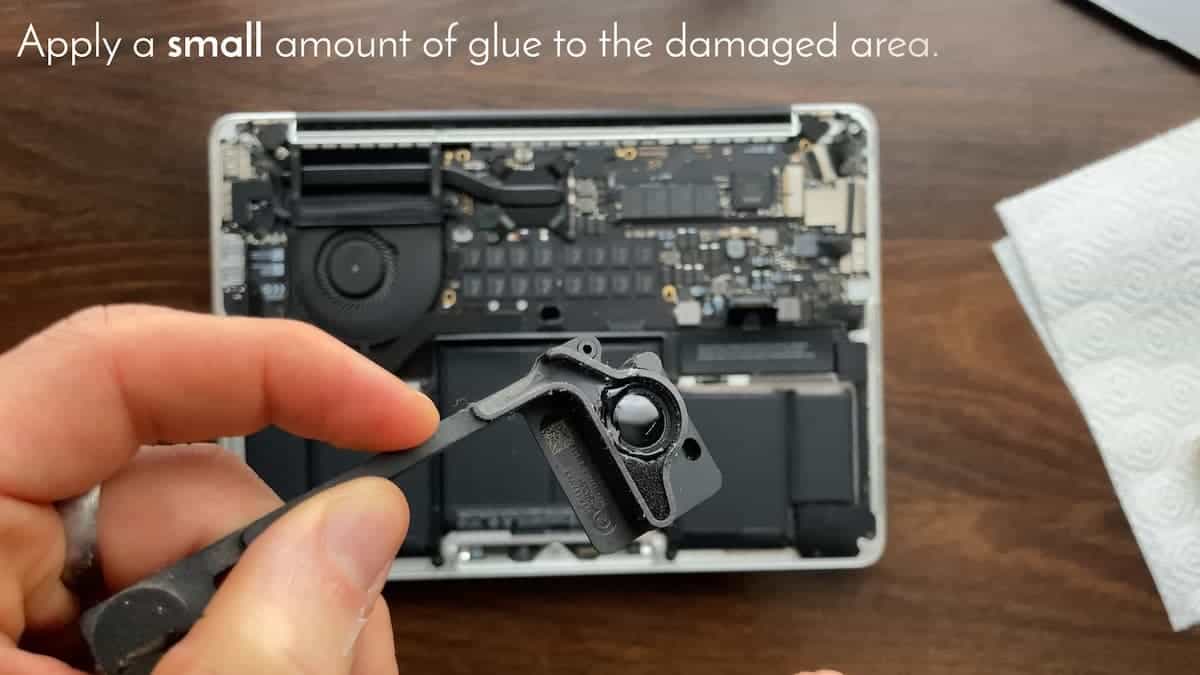
- Locate the tear in the speaker and apply a small amount of glue to the damaged area. Let it dry for 24 hours for best results.
⚠️ Make sure to apply only a small amount of glue to the tear of a speaker and not to the speaker’s whole surface since this would dampen the vibration of the speaker. A speaker that can’t vibrate properly won’t produce sound.


3. Replacing faulty speaker on a MacBook Pro
The most reliable of the three methods of repair is to replace the faulty speaker. For the older models of a MacBook Pro (such as 13″ 2013 – 2015 models), the repair itself isn’t complicated since they are held in place with three screws. For the newer models (such as 2016 and up), the repair is more difficult since the speakers are glued to the chassis of the MacBook Pro, which makes it more difficult to remove them safely.
+ best long term solution
+ for some MacBook models, relatively inexpensive replacement speakers
– lack of original parts on the market
– the sound quality of a replacement speaker tends to be worse than the original
– the most expensive solution of the three
Fixing crackling Macbook Pro’s speakers – Software issues
Unlike hardware issues that often revolve mostly around a single problem – ripped speaker’s membrane, software issues can be often more difficult to resolve.
Here is a list of options to try if you are experiencing software-related speaker problems.
1. Restart your Mac computer
This method is pretty simple. From the Apple menu, choose Restart… and wait until your mac boots up again. Check if the audio issues have been resolved.
2. Update your Mac OS to the latest version
The vast majority of software-related issues are quickly reported to Apple as the users encounter them. So if you are experiencing any software-related problem, chances are, Apple is already working on a fix which is then released in the next software update.
To make sure you’re on the latest version of your macOS, go to the Apple menu in the left upper corner of your screen -> System Preferences -> Software Update. Here you will find if any updates are available for your Mac.

3. Change the sample rate of your audio device
Many people report that changing the sample rate in the Audio MIDI setup utility to either 44 kHz 2ch 32-bit Float or 48kHz resolves their issue with crackling/buzzing audio. I recommend trying a few different settings to see if any of them solves the problem.
To change the settings, open up the Audio MIDI Setup app -> select MacBook Pro Speakers -> in the format, change the audio setting to 44kHz or 48 kHz. Check whether audio issues have been resolved.

4. Quit the Coreaudiod process
Another possible solution for sound-related issues is to quit the Coreaudiod process from the Activity Monitor. This system process is responsible for handling all aspects of audio on your macOS, such as recording, editing, playback, compression and decompression, MIDI, signal processing, file stream parsing, and audio synthesis.
When you quit the Coreaudiod process, it should restart automatically, and the sound should start working again.

If you have no audio after you quit the Coreaudiod process, either restart your Mac or run the following command in the Terminal: sudo launchctl stop com.apple.audio.coreaudiod && sudo launchctl start com.apple.audio.coreaudiod
5. Turn off user interface sound effects
Some people report that by turning off interface sound effects, the crackling audio has been resolved.
To do so, go to System Preferences -> Sound -> in the Sound Effects tab uncheck “Play user interface sound effects”.

6. Reset NVRAM/PRAM
One way to deal with sound-related issues on your Mac is to reset the NVRAM/PRAM memory of your Mac.
NVRAM and PRAM is memory that Intel-based Macs use to store specific settings such as sound volume, screen resolution, startup disk selection, time zone, and recent kernel panic information. Resetting NVRM/PRAM may resolve certain sound-related issues.
How to reset NVRAM/PRAM:
Shut down your Mac, then turn it on and immediately press and hold these four keys together: Option, Command, P, and R. Release the keys after approximately 20 seconds, during which your Mac might appear to restart.
- On Mac computers that play a startup sound, you can release the keys after the second startup sound.
- On Mac computers that have the Apple T2 Security Chip (click here to find out if you have a MacBook with a T2 chip), you can release the keys after the Apple logo appears and disappears for the second time.
⚠️ If you are using one of the latest M1 Macs, you can’t manually reset the NVRAM/PRAM since this has now been automated. Now your M1 Mac will automatically reset NVRAM while booting if it detects a problem with the memory.
7. Keep QuickTime opened
There’s a common problem with crackling sound on the 16″ 2019 Macbook Pros. A workaround that may resolve the issue is to open up the QuickTime app, then from the menu bar select file -> new audio recording. You don’t have to start the recording for it to work. You can also keep the window minimized in your dock. This workaround should stop the crackling until Apple fixes this bug with an update.
8. Prevent system overload
If working with multiple processor-intensive tasks, you are likely to encounter crackling when playing audio. The crackling can occur when your Mac doesn’t have enough processing power to perform these processor-intensive tasks. For example, when rendering a video project and playing a YouTube video simultaneously. Also, certain background tasks such as kernal_task, WindowServer, etc., may take up a lot of your Mac CPU, resulting in crackling while listening to audio.

To find out wheater your Mac CPU is being overloaded, open up Activity Monitor. From the menu bar on top of your screen, choose Window -> CPU Usage. Now you should see a widget showing your current processor activity of all of your processor cores (or processor threads). With the widget open, perform the task that causes crackling to determine whether it’s caused by the CPU being overloaded.
If your CPU meter is peaking, then sort all running processes by % CPU usage in the main window of Activity Monitor to see which process takes up the most resources of your CPU.
Now that you know which application or process is taking up the CPU resources, you can decide to quit the process from the Activity Monitor menu bar.
⚠️ If you want to quit an application/process in Activity Monitor, but you don’t know what it is responsible for, I recommend doing a Google search to make sure it doesn’t affect any apps you might be working with. In case you quit a core system process and started experiencing problems, restart your Mac to resolve the issue.
9. Try different application
Some people reported different audio issues when using specific software such as Safari, Spark AR, Xcode, etc. In some cases, for example, when experiencing audio problems in Safari, you can try Chrome or a different browser. However, in many other cases, you’ll have to wait for the software developer to fix the bug.


This is really an amazing article. Probably saved me $500 and the annoyance of the Apple Store. They have crazy wait times for appointments. Thank you!
Hi Dan! I’m glad to hear that! Encouraging comments like yours encourage me to write more content like this!
Jakub it really is a very well written article. Thank you very much! I will try the glue, hope I can find a good one 🙂
Thank you!
Jorge
Thank you very much for your content, it really gave me a lot of clarity on my issues 🙂
Hi Ayan, I’m glad I could help!