Transfer a Pizza to Stone Without a Peel with This Simple Trick

by | Kitchen

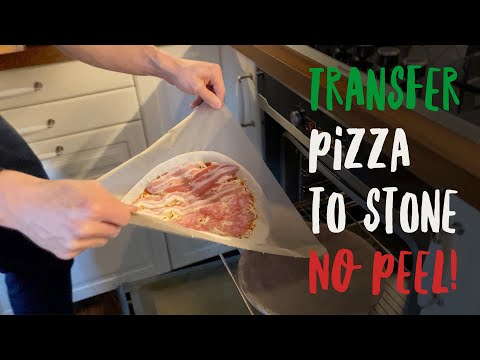
Are you having a hard time getting your uncooked pizza dough onto the pizza stone without making a mess?

In this post, you will learn an easy and reliable way to transfer a pizza onto a stone without a peel. You can also use this method to transfer a pizza from peel to stone; however, you might find that you don’t need the peel anymore. Using this simple method getting pizza into the oven has never been easier.

How to transfer a pizza to stone without a pizza peel

  1. Lay down a piece of parchment paper on a countertop and lightly dust it with flour.
  2. Stretch out your pizza dough to the desired size and place it on the parchment paper.
  3. Add pizza sauce and toppings.
  4. Grip the parchment paper by its two opposite corners and transfer the pizza onto the pizza stone in the oven.
  5. After approx. 90 seconds, pull out the parchment paper from underneath the pizza, lifting the pizza with a spatula, and finish the baking as usual.
  6. To remove the pizza from the oven, use a spatula or tongs to pull the pizza from the oven onto the baking sheet or a cutting board.

And that’s it. Now you know how to use a pizza stone without a pizza peel 🙂.

Parchment paper for pizza dusted with flour
Place the pizza on the parchment paper | HomeExplained.com
Add toppings | HomeExplained.com
Transfering the pizza to the stone
Removing the pizza from the oven
YouTube video

What is the best oven temperature for pizza?

For New York-style pizza or Neapolitan pizza, preheat your oven to 500 ° F (260 ° C) for at least 30 minutes. If your oven does not reach such temperatures, preheat it to the highest possible temperature. For Chicago-style aka deep dish pizza, set your oven to 425 ° F (220 °C).

Will the parchment paper burn if you keep it in the oven?

No. Even though most manufacturers rate their parchment paper for 420°- 450°F (215° – 230°C), from my experience, temperatures as high as 530°F (280°C) won’t burn it if you keep it there reasonably long (up to 10 minutes). The primary reason why I recommend removing the parchment paper after a while is to get a crispy and brown crust, which is a key ingredient for a tasty pizza.

If you liked the post, follow us for more. Thank you!

As an Amazon Associate, I earn from qualifying purchases. It won’t cost you anything extra, but it helps support this site. Thank you for your support!

0 Comments

Submit a Comment

Your email address will not be published. Required fields are marked *

How to wash Hoka One One shoes

How to wash Hoka One One shoes

If you own a pair of Hoka One One shoes, you are probably a serious runner, and in no time, you will have to deal with the question, how to clean your Hoka shoes to keep them in the best condition as long as possible. After my husband’s 100k Ultra SkyMarathon championship, I spent some time researching just that. Since I have not found any washing tips on the official Hoka One One website, and the answer was a bit hidden in the internet web, I have created this post to spare you some time.

The best way to wash Hoka One One shoes

The best way to clean Hoka shoes, is to hand wash them with warm water, soap, and a sponge. After washing let your Hoka’s air dry in a well-ventilated area away from direct sunlight or source of excessive heat such as radiator. Below you can find a step-by-step guide on how to wash Hoka shoes.

Can you wash Hoka One One shoes in the washing machine?

Washing Hoka One One footwear in the washing machine is not advised by Hoka due to the possible damage.

How to dry Hoka One One shoes

After washing your Hoka One One shoes, let them air dry. If you haven’t done it earlier, remove the insole (if possible) to dry separately. Depending on the room’s ambient temperature, humidity, etc., air drying Hoka shoes will take about twelve hours. If you would prefer a much faster way to dry your shoes check out our dedicated article, where we have tested five safe ways to dry shoes fast on our Hoka shoe collection.

If you decide to air dry your shoes, don’t leave them in the sun since it might damage them (the shoes might change coloring, shrink, etc.). If you live in an apartment, a great place to air dry your shoes is a window sill.

Hoka One One emphasizes that you should not put the shoes into the dryer because the heat will cause damage. You should also avoid drying your Hoka shoes near any source of excessive heat, such as a radiator.

Do not put them into the dryer because the heat will cause damage!


How I wash Hoka One One shoes

1.  Remove the laces and the insole and wash them separately with warm water and soap.
2.  Shake off any loose dirt from the shoe (some might have been hidden under the insole).
3.  Wash the shoe thoroughly with warm water, soap (optional), and a sponge. I also use a soft brush for the sole. An effective way to wash the fabric thoroughly is to rub your hands against each other while holding the fabric with one hand from the inside and the other from the outside under the running water until the water is clear. Repeat this process all over the shoe.
4.  In the end, fill the shoe with water and pour it out several times to rinse the inside of the shoe.
5.  Let the laces, insole, and shoes dry.

Here is the before and after.

How to wash Hoka One One shoes I HomeExplained.com

About the Author

Kuba is a co-founder, researcher, and writer for Home Explained since 2019. For the Home Explained, he focuses primarily on tech-related topics, how-tos, and DIY guides, and more recently, he found a passion for coffee and developing barista skills. Kuba is a natural-born researcher who loves to deepen his knowledge regarding every area of his interest. During his master’s studies he found interest in the area of healthy lifestyle, diet, and marketing. His greatest motivation is positive feedback from readers that find help in his articles.

As an Amazon Associate, I earn from qualifying purchases. If you purchase anything using Amazon links on this website, I will get a tiny commission. It doesn’t cost you a thing but helps this website grow.

Thank you for your support!

Recent Posts

How to Dry SodaStream Bottles Effectively

How to Dry SodaStream Bottles Effectively

In this short post, you will find a simple solution to dry your SodaStream bottles effectively.Best Practice for Drying SodaStream bottles The key to quick and efficient drying of SodaStream bottles is to keep the bottle upside down and provide proper ventilation....

What to Do When the Brita Indicator Stops Working?

What to Do When the Brita Indicator Stops Working?

The indicator on the Brita water pitcher reminds us when to change the water filter. This seemingly minor function plays a significant role since an old filter might affect the cleanliness of the filtered water. When the indicator stops working, it is good practice to...

How to Clean Brita Pitcher’s Handle

How to Clean Brita Pitcher’s Handle

Cleaning a Brita pitcher is usually easy, but some models, like the Lake Water pitcher, have a handle design that can trap dirt which seems impossible to clean. But there is a simple solution. Keep reading for a step-by-step guide on how to clean the Brita pitcher's...