How to Print a Poster-Sized Image on Mac
If you want to print a large image on multiple pages on Mac, you have a couple of options when it comes to the software:
- Preview + Adobe Acrobat Reader DC – most convenient with multiple settings
- Safari – the fastest & simple
- Preview – a bit cumbersome but the most customizable
- Numbers – simple
Preview + Adobe Acrobat Reader DC
When using Adobe Acrobat Reader, you will need the image in PDF format. To export the picture to PDF, we will use Macs Preview. If you know how to do it, you can skip straight to step 7.
To print a large image on multiple pages on Mac using Preview and Adobe Acrobat Reader:
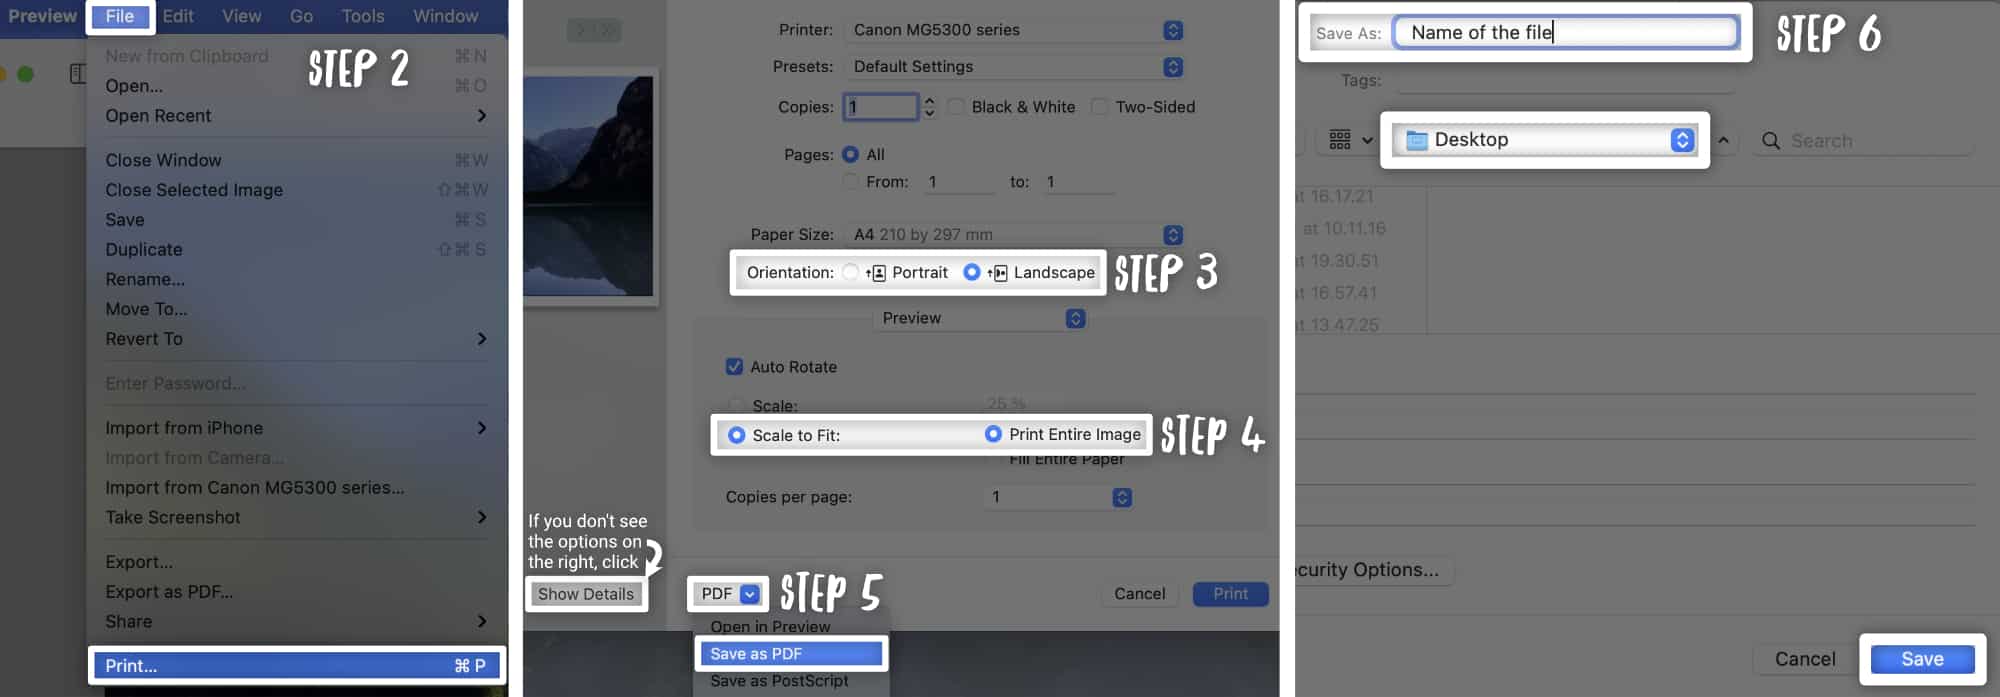
- Open the image in Preview.
- Click File -> Print (or use the shortcut ⌘+P).
- Choose an appropriate orientation for your photo (Portrait or Landscape). If you don’t see this option click the Show Details button under the previewed image.
- Set the Scale to Fit option to Print Entire Image.
- Choose the Save as PDF option from the PDF menu at the bottom of the window.
- A new window will appear where you can change the file’s name and choose where you want to save the file. Finally, click Save.
- Right-click the new PDF file, and from the Open with menu, select the Adobe Acrobat Reader DC. If you don’t have this software installed, you can download it for free from Adobe’s official website.
- Click the Printer icon (or use the shortcut ⌘+P).
- Under the Page Sizing & Handling, select Poster.
- If you want to print as large an image as possible on a given number of pages, you can play with the Tile Scale, e.g., to print as large an image as possible (landscape) on two pages, I set the scale to 131 % with the Cut marks option unchecked. If you want to print the cut marks, you will need to print the image on more pages to get the same image size.
- Finally, click Print, and you are done.
Safari
Here is a step-by-step process to split an image for printing on a Mac using Safari:
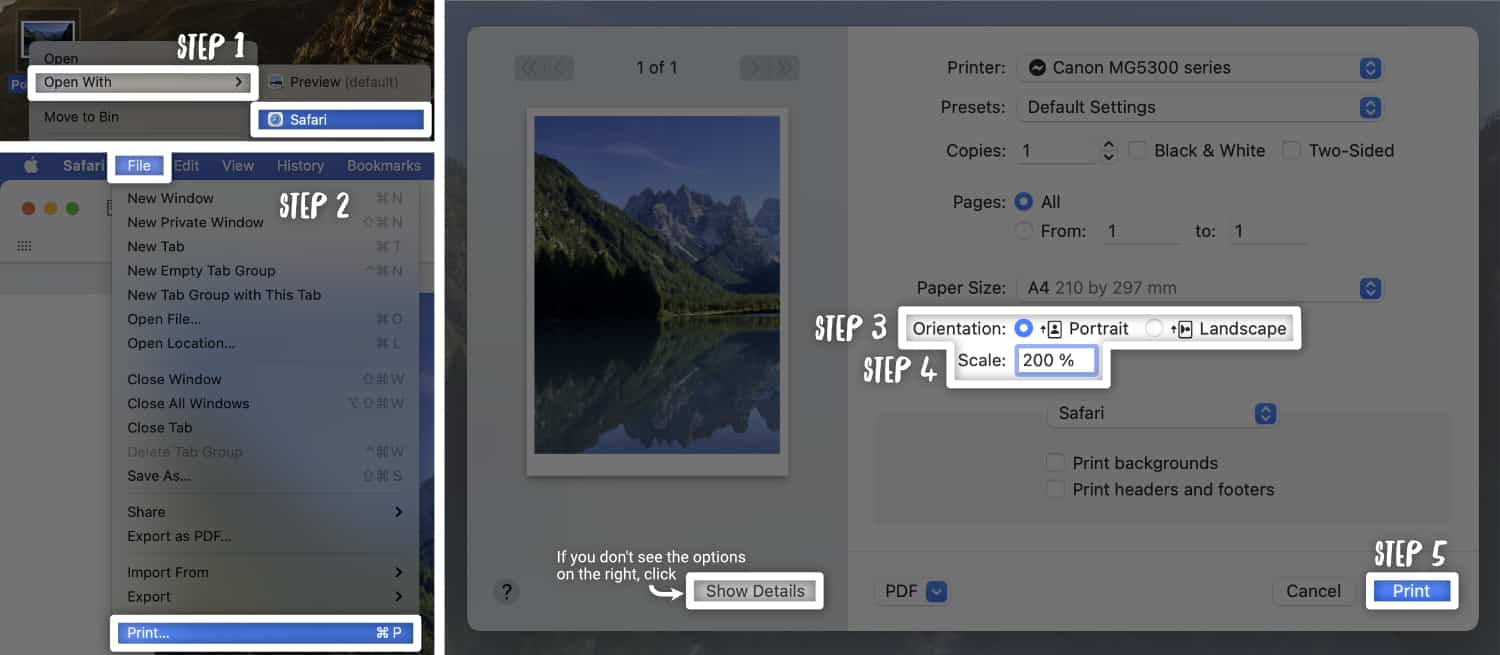
- Right-click the image you want to print and select Open With -> Safari.
- Click File -> Print (or use the shortcut ⌘+P).
- Choose an appropriate Orientation (Portrait or Landscape). If you don’t see this options, click the Show Details button below the previewed image.
- Set the Scale to the desired size (e.g., 200 % to print a landscape photo on two pages).
- Click Print.
TIP: Above the previewed image, you can see the number of pages it will be printed on. You can use the arrows above the image to see how each page looks. In some cases, e.g., printing a landscape image scaled to 200 % on two pages, it wants to print on four pages, but pages 3 and 4 are blank. If you want to exclude those two blank pages, set the Pages option to From: 1 to: 2.
Preview
Unfortunately, Preview does not support printing one image on multiple pages. However, there is a workaround that will allow you to print a photo on multiple pages using just Preview. It is a bit cumbersome, but it gives you a lot of freedom to split the image exactly the way you want.
Here is an example of how to print a landscape image on two pages using Preview:
- Open the image in Preview.
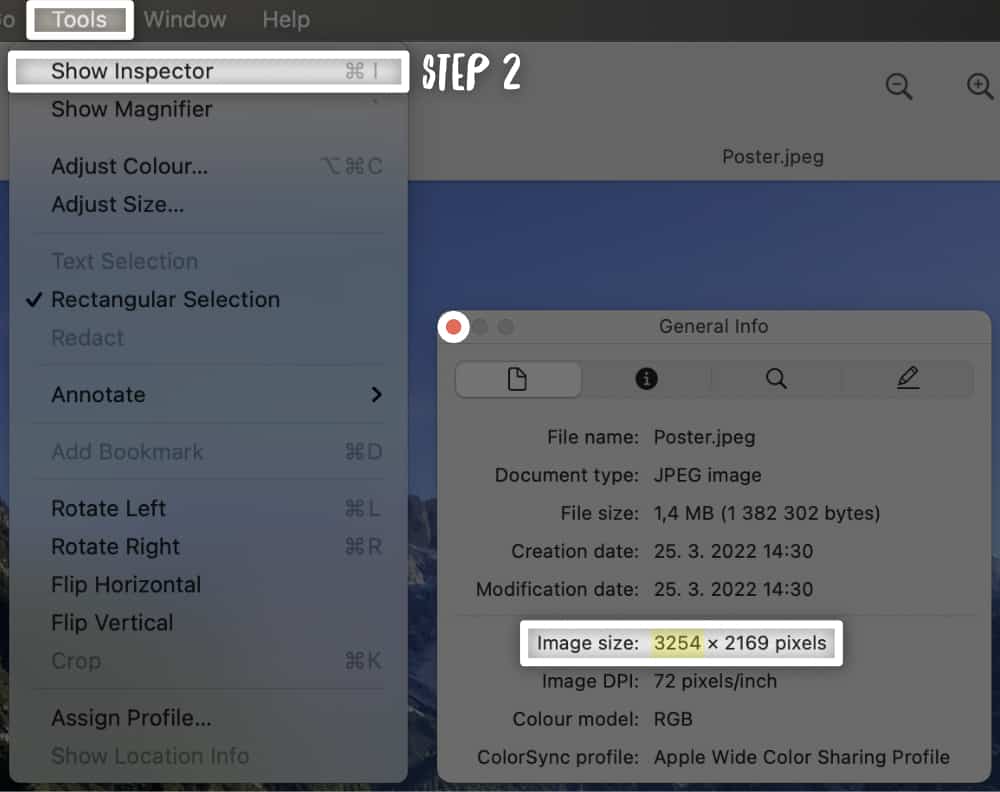
- Click Tools -> Show Inspector (or use the shortcut ⌘+I), note the photo’s Pixel width and close the Inspector window.
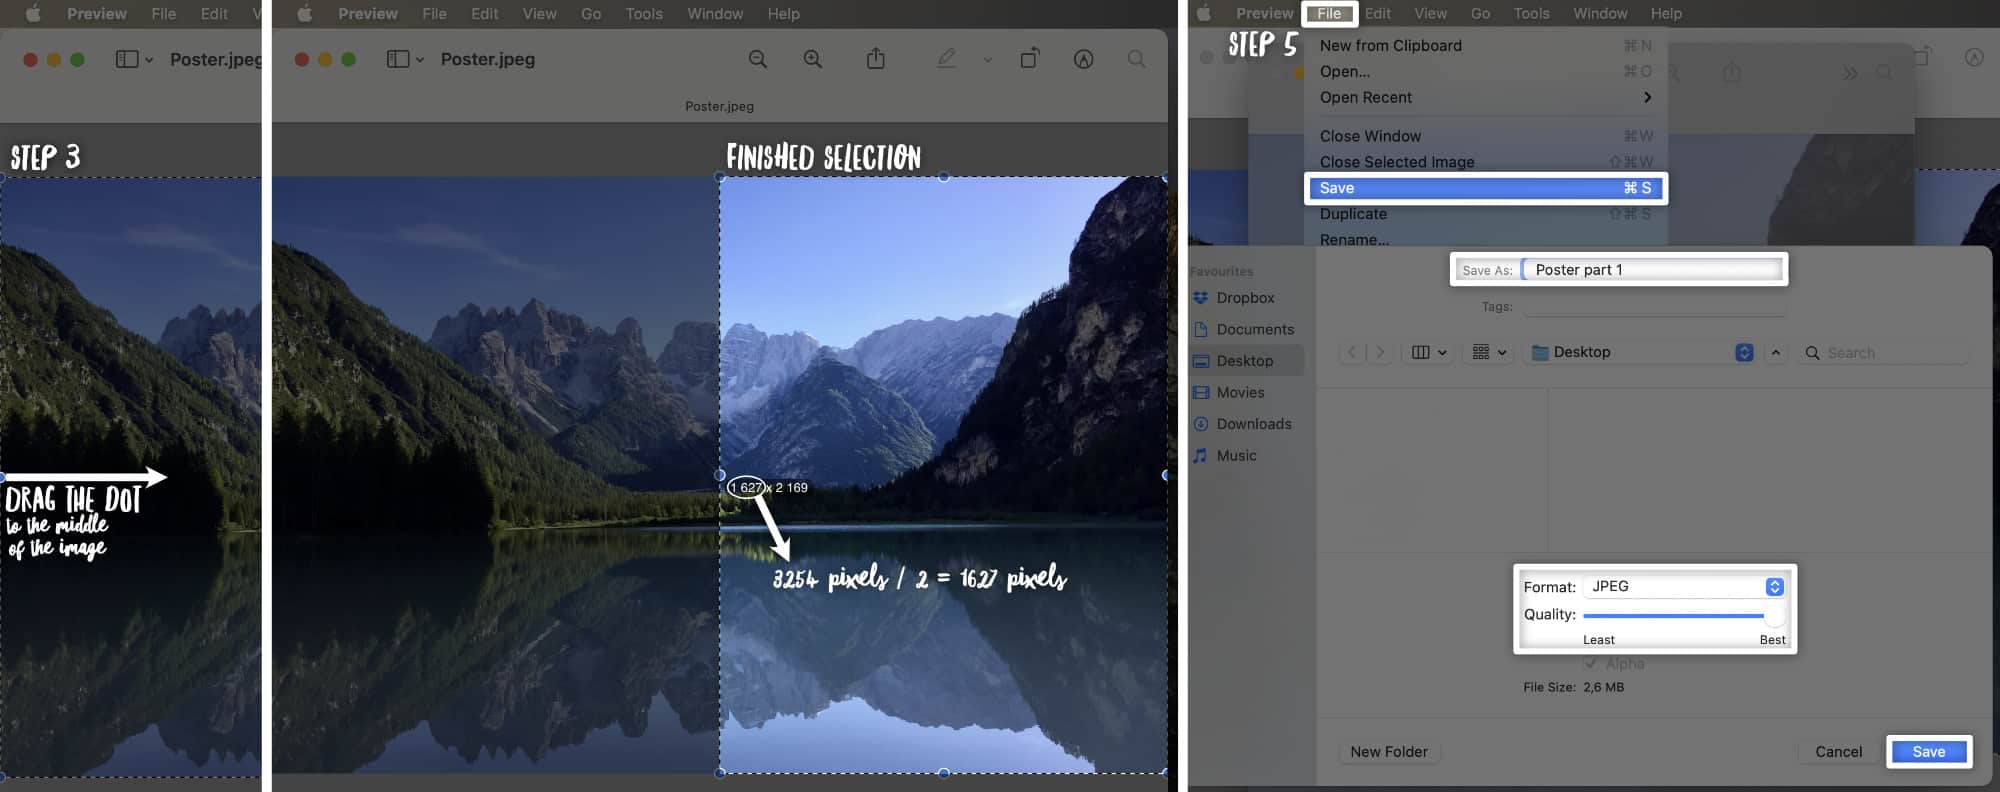
- Click Ctrl+A to select the entire image. Now grab the blue dot on the left side of the image and drag it precisely to the middle of the photo. Preview will show you the width in pixels, so you can easily find the middle of the picture.
- Now click Ctrl+C and then Ctrl+N. This way, you will create a new image from the selection.
- To save the new image click File -> Save… (or use the shortcut ⌘+S), select the JPEG Format, set the Quality to Best, and click Save.
- Go back to the original image and repeat steps 3 and 4, selecting the picture’s second half.
- Print both new images as usual.
You can play with this method and split the image into as many parts as you want. But it is a bit cumbersome. Using Preview with Adobe Acrobat Reader is a much easier way to go about it.
Numbers
You can also print an image over multiple pages using Numbers. Here is what you need to do:
- Open a new blank document in Numbers.
- Delete the initial table by clicking Delete on the Sheet 1 drop-down menu.
- Import the image to the document using drag and drop or click Insert -> Choose, select the image you want to print, and click Insert.
- Select the Original Size button on the Arrange sidebar to adjust the image to its original size.
- Also, change Position X and Y to 0 on the Arrange sidebar.
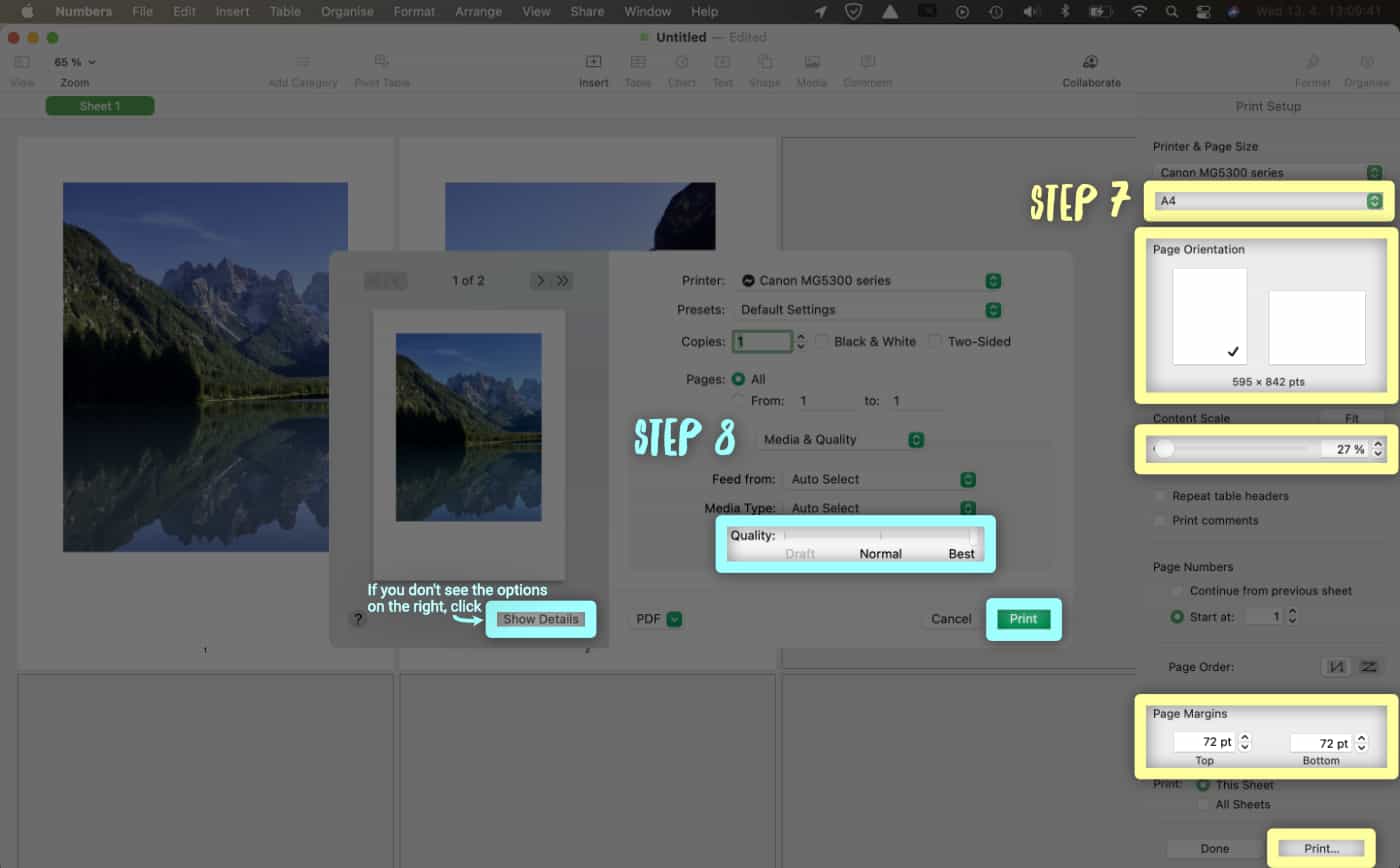
- Click File -> Print (or use the shortcut ⌘+P).
- You can change settings like Page size, Page Orientation, Content Scale, and Page Margins to suit your needs on the right sidebar. Finally, click Print.
- You will see a table from the printer where you can set additional settings like Quality of print. If you don’t see such options select Show Details under the previewed photo.
- When you are ready, click Print.
TIP: Numbers automatically adds page numbers. If you want to delete them, click behind one of the numbers and delete it using backspace.
.







Thank you very much!!!
Adobe did not allow ‘poster’ printing with this file, but your guidance for Numbers worked like a charm.
Thank you for your comment 🙂! I am glad the Numbers tip helped!