
In this article, you’re going to learn exactly how to remove the anti-reflective coating from your MacBook Pro’s display – the best, easiest, and also an eco-friendly way. Also, you’ll find a simple solution for those who want to restore the anti-reflective qualities of the display.
But before we jump right into it, let me give a little disclaimer:
If you proceed to do anything you read in this article, you do it at your own risk. I’m not taking responsibility for any damage in case you break or damage your computer. I’m just a guy who had the same problem as thousands of others. I’m just trying to help.
Also, in case you are not aware, there is an ongoing Anti-Reflective Coating Repair Program for MacBooks not older than 4 years since the date of the original purchase.
In case you are not sure whether you’re eligible for the free repair, I would strongly recommend visiting an Apple store or your local retailer to see if they can help before you proceed to deal with this issue on your own.
Table of Contents
– What’s causing the anti-reflective coating to wear off/delaminate?
– How to prevent staingate on my MacBook Pro?
– Can the anti-reflective layer be repaired?
– How much does the MacBook Pro Retina’s screen coating repair costs?
– Should I remove the anti-reflective coating or keep it as is?
> Reasons for the removal of anti-reflective coating
> Reasons against the removal of anti-reflective coating
– How to remove the anti-reflective coating from the screen?
– Is it safe to use baking soda? What is the logic behind it?
– Are there any other ways to remove the anti-glare coating from MacBook Pro?
– How much more reflective is the screen without the anti-glare coating?
– Which models of MacBook may be affected by this anti-reflective coating issue?
What’s causing the anti-reflective coating to wear off/delaminate?
It’s not completely clear what’s causing this issue to arise, but when researching this topic, as well as from my own experience, I found multiple causes of this problem. The main three being acidity, abrasion, and heat.
Here is the list of specific reasons, which may cause this problem to appear:
- Touching the display.
- Oil and sweat from your fingers on your keyboard and trackpad can cause deterioration to the display when the lid is closed.
- The heat dissipated from the CPU fan.
- The pressure of the screen against the keyboard (e.g., in a crowded backpack).
- Use of strong display cleaners.
How to prevent staingate on my MacBook Pro?
First off all it’s a design flaw, so it’s not clear whether you can prevent this problem from appearing on your MacBook.
On the other hand, there are factors that can speed up the process of delamination. In the following paragraph, you will find a few preventative measures you can take to minimize the chance of delamination:
- Do not touch the display (try to open your MacBook only by the hinge).
- Keep your keyboard and trackpad clean (from grease and sweat).
- Use a dampen (with water) lint-free cloth to clean your MacBook Pro’s screen (source).
- Do not clean your display often nor excessively.
- Do not use alcohol-based display cleaners (preferably avoid all display cleaners).
- Don’t carry MacBook in a crowded backpack – prevent pressure on the lid against the keyboard.
However, from my own experience, I can say that even if you take all precautionary measures, the delamination problem may still occur. The only difference I noticed was the rate of deterioration.
With my first display, I used an alcohol-based LCD cleaner and the microfibre cloth that my MacBook came with. I was trying to keep my screen clean, so I cleaned it approximately 1-2x a month. After a year or so, I started noticing minor delamination on the display. Since I was still eligible for free repair under Apple’s Anti-Reflective Coating Repair Program, I did not hesitate. I brought it to the local store and got it fixed.
Since it took 3 weeks to get it back, I made sure to do my best in order to prevent this issue from coming back in the future.
As you already know, although I have tried to prevent the non-reflective layer from peeling off with all possible measures, I have not succeeded. The main difference was that the anti-glare coating lasted almost 3 years after the initial replacement of the screen. Unfortunately, 5 years after the replacement, the anti-reflective layer became so deteriorated that I decided to remove it altogether.
Can the anti-reflective layer be repaired?
The anti-reflective layer on your MacBook/MacBook Pro can’t be repaired. The only options you have are to either replace the whole screen of your MacBook or to remove the damaged anti-reflective coating.
However, you can use an anti-reflective screen protector to solve the lack of the original anti-reflective layer. It’s a simple and inexpensive solution for those who want the anti-reflective qualities of the display, and as a bonus, it also has an anti-fingerprint and scratch-resistant qualities. If that’s something you are interested in, you can check out the following links depending on the model of your MacBook.
Recommended anti-reflective screen protectors (Amazon links):
Anti-reflective screen protector for 13″ MacBook Pro (2012-2015)
Anti-reflective screen protector for 13″ MacBook Pro (2016-2020)
Anti-reflective screen protector for 15″ MacBook Pro
Anti-reflective screen protector for 12″ MacBook (2015-2017)
How much does the MacBook Pro Retina’s screen coating repair costs?
Depending on the model of your MacBook Pro, the repair of the anti-reflective coating will cost between $500 and $800. The high price of the repair is due to the fact that you have to replace the whole screen. Off-course, if your computer is under AppleCare, the price will be lower.
Should I remove the anti-reflective coating or keep it as is?
As I stated earlier, first, make sure whether or not your computer is eligible for a free repair.
In case you are not eligible for the free repair and are not willing to pay for the replacement of your screen, you may want to consider removing the anti-reflective coating.
If you are questioning whether it’s worth removing, here are my thoughts. In case your screen has only minor defects, and you don’t really notice the issue in day-to-day use, I would not recommend removing it.
On the other hand, if the delamination is very noticeable (covering the majority of your screen) and disrupts your workflow, especially for those working with video or graphics, removing it can be a simple fix. However, it is important to realize whether you are willing to give up the anti-reflective properties of your display completely. If you’re using your computer mostly indoors (or in places without direct sunlight) where higher reflectivity isn’t an issue, than it could be the way to go. If higher reflectivity is an issue for you, you could also use an anti-reflective screen protector with a similar effect as an original coating.
To help you decide, I have created a list of reasons for and against the removal.
Reasons for the removal of anti-reflective coating
- Highly damaged anti-reflective coating.
- A MacBook used mostly indoors or in places without direct sunlight.
- Higher reflectivity doesn’t pose a problem for your workflow.
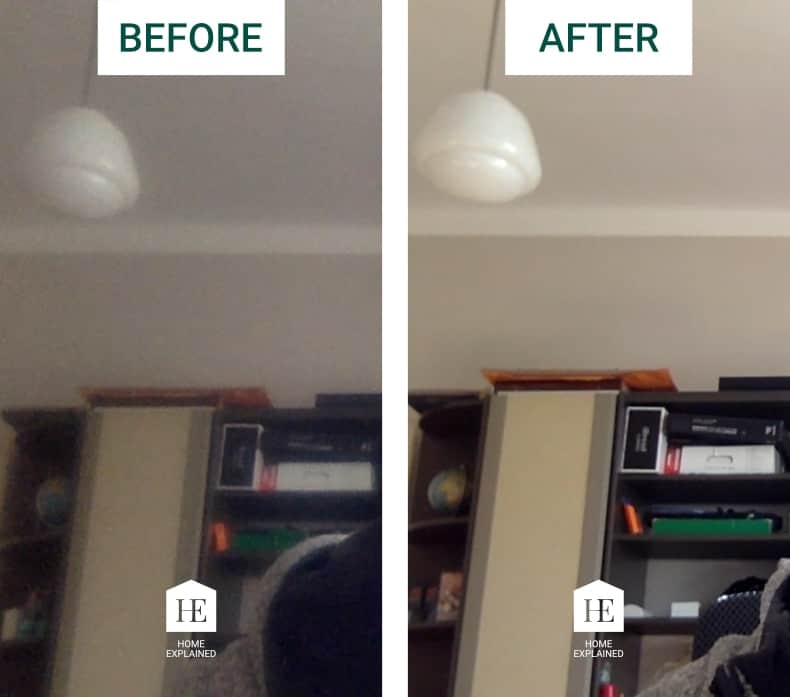
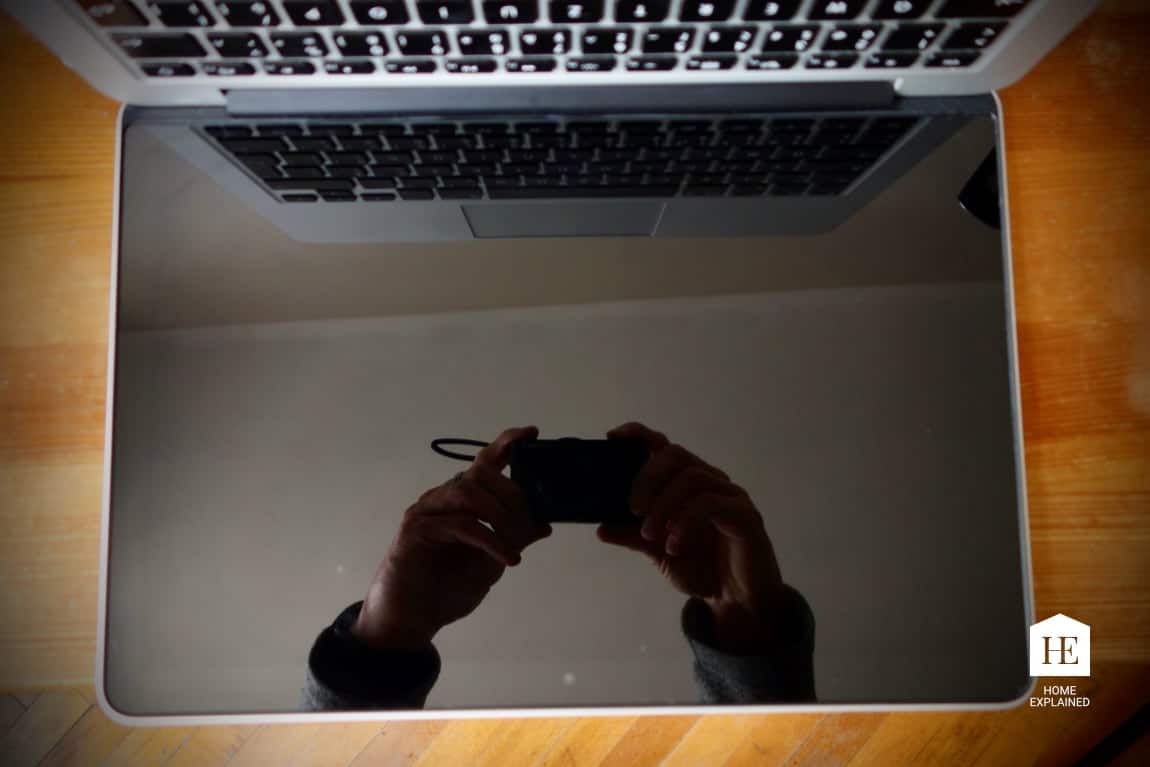
- Frequent webcam use (when the delaminating gets bad, it can also affect the quality of your built-in camera – see image below).
- Delamination affects your workflow (eg., editing pictures, or videos).
Reasons against the removal of anti-reflective coating
- The screen has only minor defects.
- Frequent use in direct sunlight or outside (can be mitigated with an anti-reflective screen protector).
- The risk of damaging the screen if the coating is removed carelessly.
- Delamination doesn’t affect your workflow (removal solely for aesthetic reasons).
How to remove the anti-reflective coating from the screen?
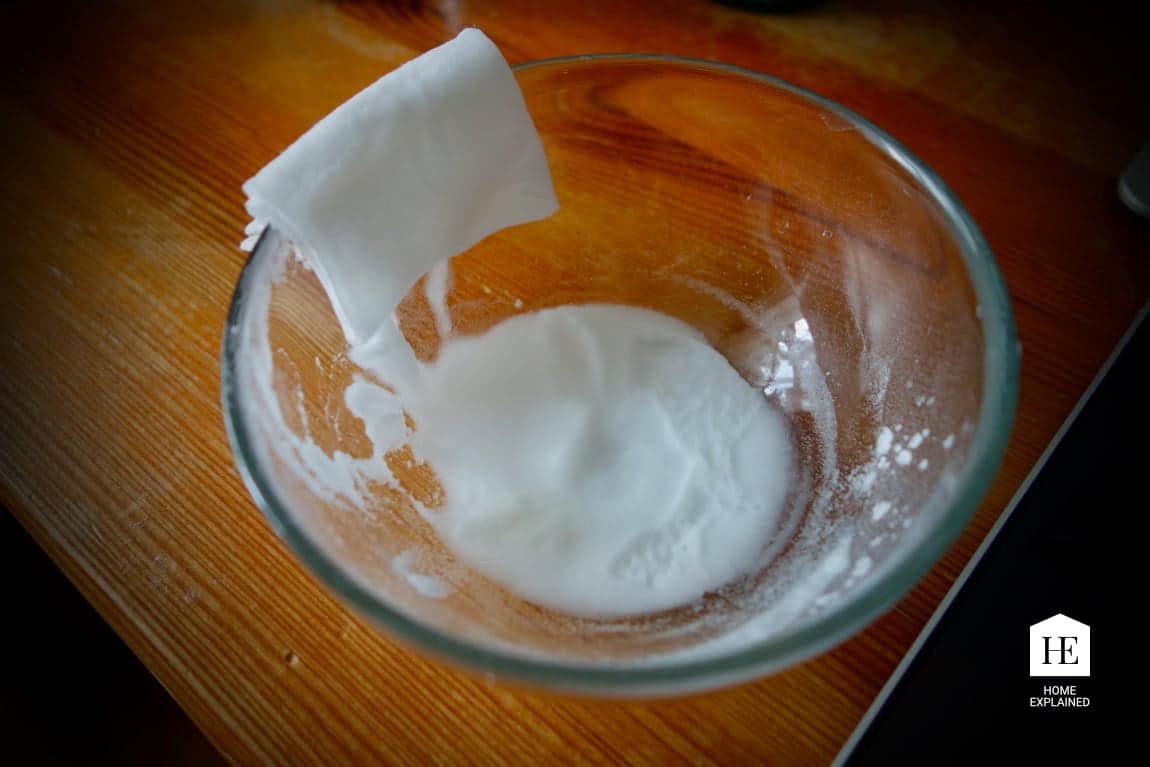
The best and easiest way to remove the anti-reflective coating from the screen of your MacBook Pro is to use a solution of baking soda and water. But before you proceed to remove it, read the following steps to prevent any damage. Also, check out the list of devices this method is suitable for, as it is intended to be used on Macbooks with glass panel displays.
Step 1
Prepare a solution of 2 tablespoons of baking soda mixed with approximately 1 and 1/2 tablespoons of water. The consistency of the solution should be quite thick, not too watery.
Step 2
Place your laptop on the back of your screen on a clean cloth or a towel (to prevent any scratches while removing the anti-reflective layer).

Step 3
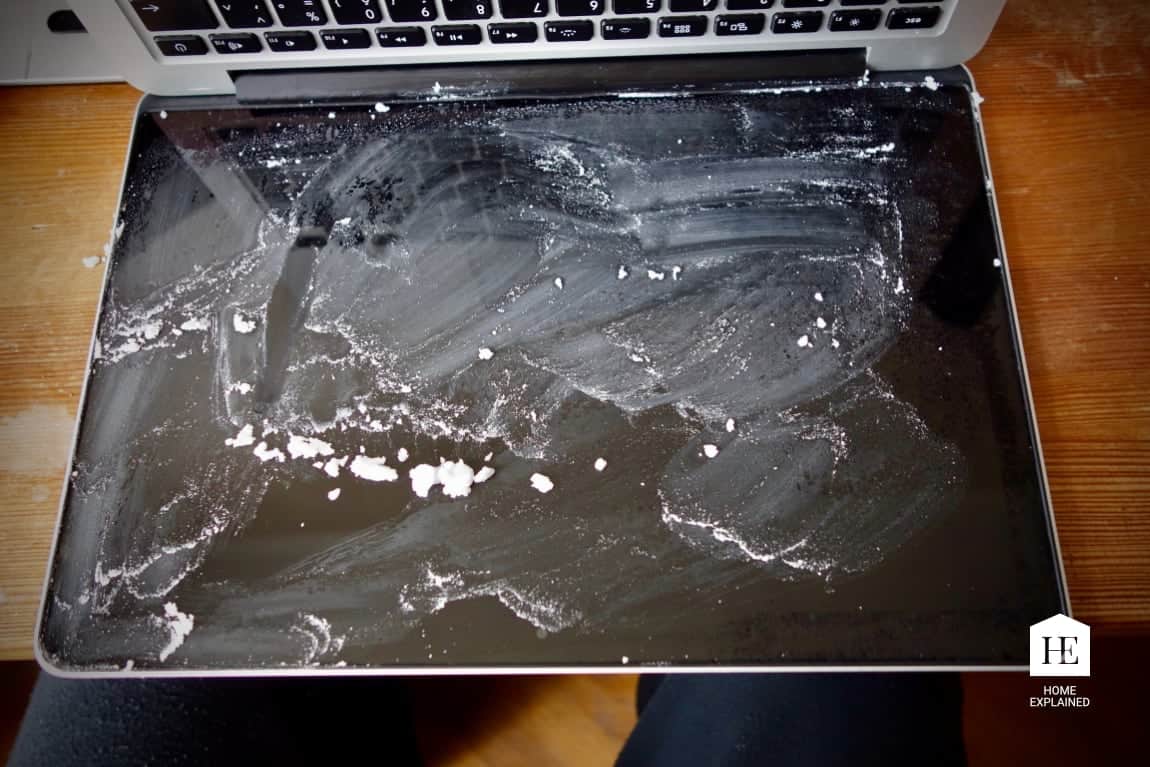
Dip the cloth in the prepared solution and rub the screen in a circular motion with the solution (do not apply too much pressure on the screen). In a matter of minutes, you should see the anti-glare coating start to come off.
Step 4
If necessary, reapply the solution and repeat the 3rd step until all the anti-reflective coating is removed.

Step 5
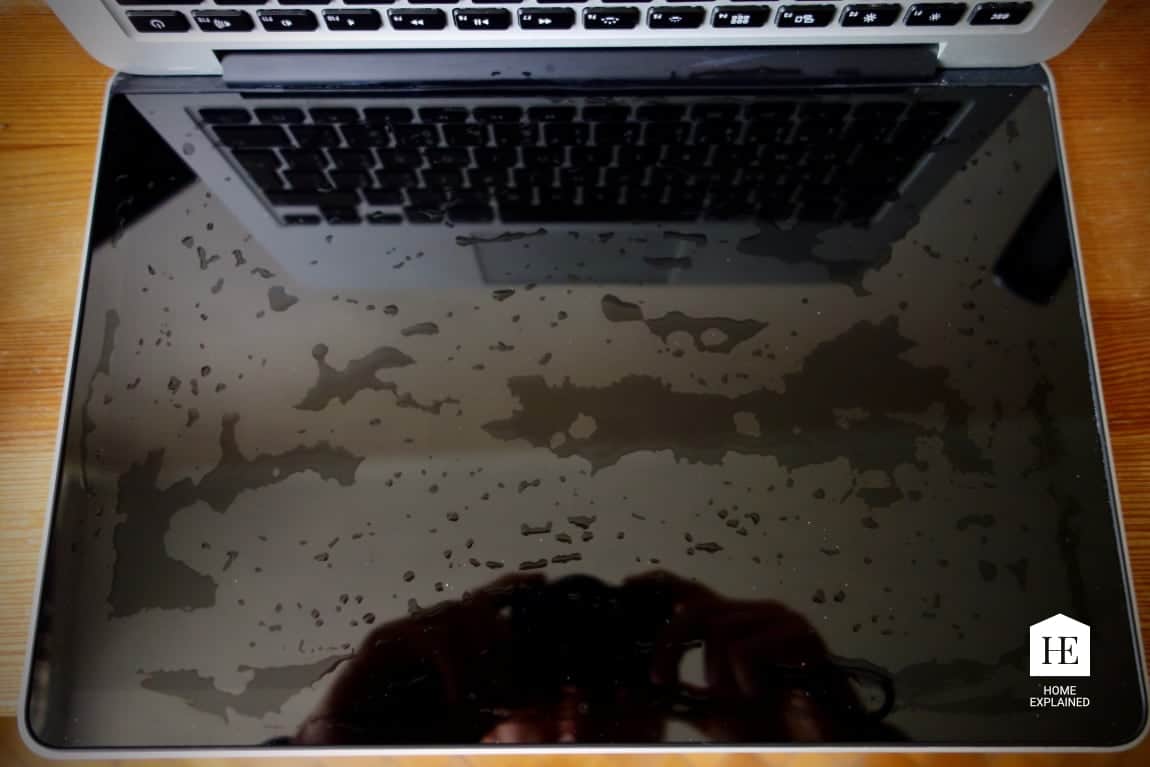
With another clean cloth, dampened with water, remove the excess baking soda solution from the screen, repeat a couple of times if necessary.
Step 6
Finish the cleaning with a dry clean cloth, let the screen dry completely.
Step 7
If some of the baking soda gets stuck in the corners of the screen, use a soft toothbrush to brush it out.

Video guide
If you want to see the complete removal process of the anti-reflective coating on my 13″ Macbook Pro (2015) using the baking soda method, you can watch the following video.

Is it safe to use baking soda? What is the logic behind it?
Unlike most other cleaners recommended for this purpose, the baking soda has abrasive qualities, which I find perfect for this job.
Since baking soda has a hardness value of 2.5 on a Mohs’ scale of mineral hardness, it should be safe to use on the glass, which has a hardness around 4-7 on a Mohs’ scale (depending on the type of glass).
As you can see, in the above pictures, my screen looks perfectly clean without even a hint of a scratch. It took me just a few minutes to remove the coating from the screen. Since this method doesn’t require any strong chemicals due to mild abrasive qualities of baking soda, I find this method to be by far the best.
Are there any other ways to remove the anti-glare coating from MacBook Pro?
There are many tips and DIY guides on the web on how to remove the anti-reflective coating from the screen of your MacBook Pro. I’ve tried a couple, but none of them was as good and effective as mine.
If for some reason, you would like to use something nonabrasive instead, you can use Listerine, rubbing alcohol, or wet wipes. However, people reported that it took a couple of hours to get the job done. I would strongly recommend avoiding acetone (or acetone-based cleaners) since some people reported permanent damage to the screen.
Other cleaning agents people recommend on the web (not tested by Home Explained):
- Listerine,
- Clorox wipes (wet wipes in general),
- Mr. Clean Magic Sponge,
- Rubbing alcohol,
- Floor cleaner.
Some people suggest that steel wool could also be very effective in removing the AR coating. While I believe it can be effective, I personally haven’t tried it and would be very cautious about doing so. Since steel wool has a much higher hardness (4 on a Mohs’ scale), there is a chance it could potentially damage your screen. In the end, it’s not really clear what hardness of glass does Apple use; thus, I can’t recommend this method.
How much more reflective is the screen without the anti-glare coating?
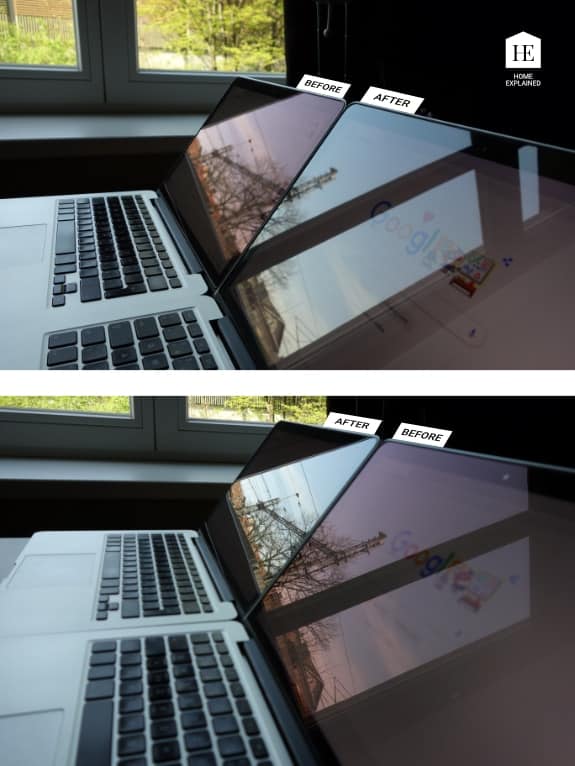
In case you are wondering how big of a difference in reflectivity is between the screen with the anti-glare compared to the screen without it, you can judge it for yourself in the following comparison.
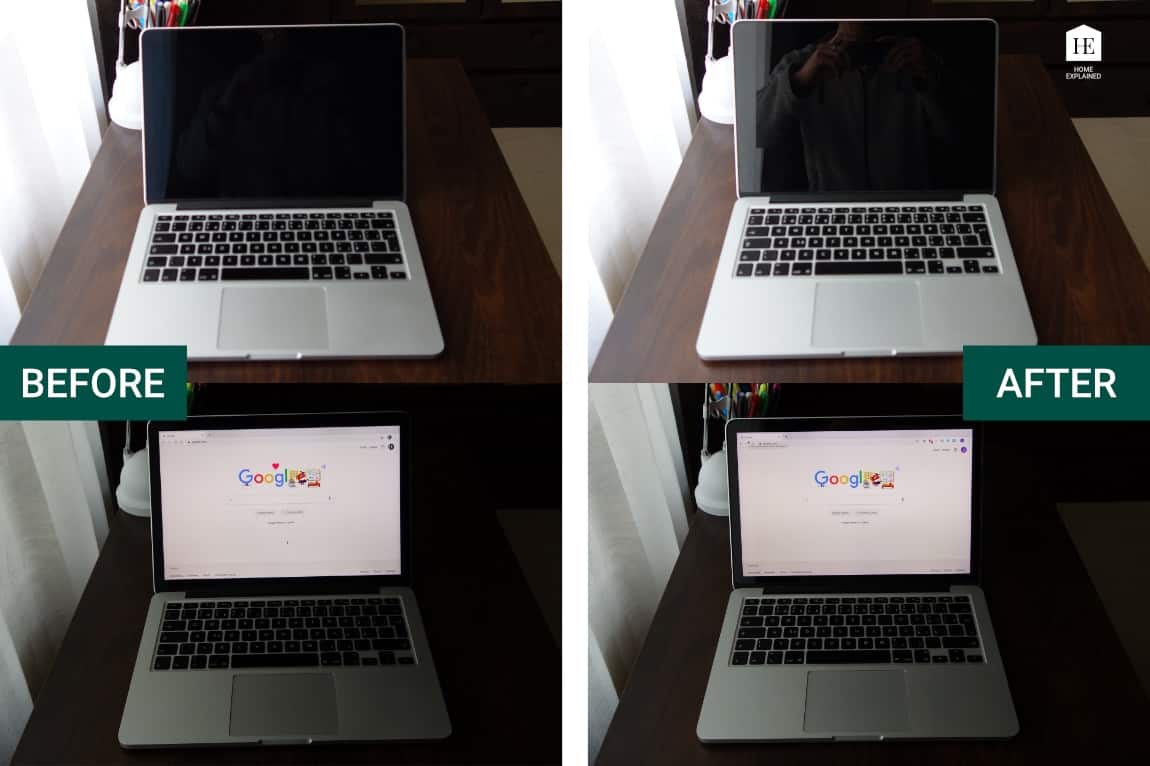
In the above comparison, you can see two MacBooks that I have placed on a table next to a window in daylight to demonstrate the anti-glare properties. It was taken at 10:00 am, on a sunny day, with clear skies.
When the screen is turned off, the higher reflectivity is more apparent, but with the screens turned on (on full brightness), the differences are much less visible. One thing I’ve also noticed is that the use of curtains can also lower the reflectivity of your display.
Before I decided to remove the anti-reflective coating, I was a bit worried that the higher reflectivity will bother me. But after a month of use, I can safely say that I barely notice it, if at all. Of-course If you have two computers (one with and one without the coating) next to each other, the difference is visible, but if you have nothing to compare it to, you will barely notice it. However, suppose higher reflectivity of the screen is an issue for you. In that case, you can use an anti-reflective screen protector with a similar anti-glare effect as an original coating.
Which models of MacBook may be affected by this anti-reflective coating issue?
I guess it would be easier to write down those that aren’t affected. But if you are wondering, here is the list:
- MacBook Pro (Retina, 13-inch, Late 2012),
- MacBook Pro (Retina, 15-inch, Mid 2012),
- MacBook Pro (13-inch, Early 2013),
- MacBook Pro (15-inch, Early 2013),
- MacBook Pro (13-inch, Late 2013),
- MacBook Pro (15-inch, Late 2013),
- MacBook Pro (13-inch, Mid 2014),
- MacBook Pro (15-inch, Mid 2014),
- MacBook Pro (13-inch, Early 2015),
- MacBook Pro (15-inch, Mid 2015),
- MacBook Pro (13-inch, 2016),
- MacBook Pro (15-inch, 2016),
- MacBook Pro (13-inch, 2017),
- MacBook Pro (15-inch, 2017),
- MacBook (12-inch, Early 2015),
- MacBook (12-inch, Early 2016),
- MacBook (12-inch, Early 2017).


Thank you, it worked like a charm. It took me some 20 minutes in total, I’d say 10 minutes to remove the coating alone. There where two spots which were hydro repellent initially, but that was because of the coating. After some time they finally came off. The result is amazing, I almost forgot how bright the screen was. Thank you very much, spot on!
You’re welcome! I am glad that it helped. Enjoy your bright screen :).
Thanks for posting this fantastic and informative article.
It worked a treat on my MacBook Pro looks brand new now.
My 15” mid 2014 is like new!
Tanks a lot
The last model you mention as susceptible to this issue is early 2017. Does that mean Apple has fixed the problem for computers newer than 2017; for example, a 2019 MacBook Pro?
Hi Deanne! It is not clear whether Apple has done any change to the anti-reflective coating of their Macbook lineup. While researching this topic, I noticed a couple of instances of people having this issue even on a never laptops (2018, 2019). If the problem arises in a greater measure again, Apple will likely just add the newer models to the repair program. Hope that helps, Jakub.
Thank you for this!! My screen was looking so bad. There were scratches and blotches everywhere from the coating wearing away. I think it must have taken me about 20 minutes as well. Mine was really bad so it took about 4 different wipe downs but my laptop looks brand new now!!! I am so beyond happy. Apple wouldn’t help me with it and wanted to charge me to replace the glass costing me an arm and a leg.. pfffff. Thank you so much OP!
Hi Nicolette! Thank you for the kind words, I’m glad it helped!
Same here my screen was looking very bad i didn’t used to have interest but must say just four days ago after I tried it’s amazing laptop looks almost new now
Thank you I hope Apple solves this problem of anti glare screens
Thanks! Very helpful posts.
Hi Rachel, I’m glad you liked it.
Thank you so very much Jakub! As the title says, this is the best and easiest way to remove the anti-reflective coating from my MacBook Pro (Retina, 13-inch, Late 2013)!
You’re welcome :). Personally, I was surprised when I discovered how effective the baking soda was.
Thank you so much! You saved me $496.
Hi, I’m glad I could help and save you some money!
Jakub you are the man! I got some rain drops on my screen when I was outside during a zoom meeting and the screen was streaked and looked BAD and I had no idea why! I rubbed it hard with a lens cloth and it got worse! It looked like a coating on the screen was coming off – and it turns out that’s exactly what was happening. I am an educator and multimedia specialist – so my screen and its sharpness and color is critical. It is PERFECT now – THANK YOU SO MUCH!!
Hi Ken, thank you for the kind words, I’m glad I could help!
W5 Multi-purpose cleaning wipes from Lidl did the trick for me in less then 10 minutes, 75 cts a pack.
My screen looks brand new, and fair enough reflects stronger in day light. Can probably fix that with a 14,95 protection foil from Amazon.
Hi Erik, thank you for the tip, I’m glad you found a good alternative that works for you! If I can get my hands on the W5 Multi-purpose cleaning wipes I’ll give it a try, since my wife’s MacBook screen is getting pretty bad as well.
What other precautions can we take to avoid these anti glare
What I do is I wait for a minute after switching it off before closing the laptop
And also I put a white sheet to separate the screen from the keyboards
Hi. I’ve tried W5 cleaning wipes from LIDL as well and I was shocked how easy it is going down. Thanks for a tip. W5 works perfectly. 10min est. time. No issues, screen as new. THANK YOU ALL guys!
Superb! I’m glad you I could help :).
W5 Multi-purpose wipes is solve a problem, thanks guys 😀
THANKS …. 5 minutes with any multi purpose cloth and it was gone
Thanks so much Jakub! I didnt have staining that was too bad, but it was where it was that was annoying. I could basically see an outline of the trackpad where the anti-glare had come off. I’m a qualified apple service tech but I didnt know about the baking soda. It absolutely works a treat and I’m actually not too bothered about how reflective the clean screen is. Only difficult bits were the edges of the screen, especially near the keyboard. No scratches whatsoever – you sold me when you talked about the Moh’s scale, it gave me the confidence that you knew what you were talking about.
Very BIG THANKS!!
Hi Kola, thank you for the nice comment! Honestly, after some time, I really do not notice the higher reflectivity of the screen, so I’m quite positive after a while, you will barely notice it if at all! I’m glad I could help!
I have a Macbook air 2011 that accidentally got residue from a Method cleaner used to clean the rest of the machine. The screen looked terrible where the keys and trackpad smudge the AR coating. I used your baking soda method and was able to get about 90% of the coating removed, however, since then nothing I do seems to budge the remaining 10% which is very visible. I’ve tried, Lysol wipes, Isopropyl alcohol, glass cleaner, method cleanser (originally caused the problem), cook top cleaner, auto polish, glasses cleaner, screen cleaner, and Mr Clean Magic Eraser. I am super frustrated because the original suggestion of baking soda seemed like a good solution, but not able to do the complete job. Any ideas why some of it is so stubborn and anything else I can try??
Hi Andy! If you notice the Macbook Air 2011 is not on the list of reported devices with possible AR issues, which indicates Apple used different type of screen, and thus I would not recommand to use the method described in this article. As far as I know, older models such as Macbook Air didn’t have a glasss screen protecting the LCD panel which sits behind it, like the newer Macbook Pro’s have. Unfortunately in your case I’cant give you any further advice, since I’ve tested my method on device with a glass screen. The good news is that the older displays for devices such yours are much cheaper to purchase.
Personally, I was surprised when I discovered how effective the Lidl W5 works perfectly.
Hello.
I just finished removing my anti reflective coating. I used hand wet wipes to remove the coating and after I used some floor anti bacterial solution and let it soften the residue that remained after removing the coating. Polished with micro fiber cloth and it is shinny. Looks good.
The bad stuff. Viewing angle is poor from side to side. The display has a green-ish tint for darker colours and the colours seem a bit faded (i was kind of expecting this). However, I recommend changing the colour profile from the default Colour LCD to Generic RGB Profile. Why? Because it darkens the image a bit and adds a touch of colour, feels more like it used to be.
Sad to see the a-r coating go, but I’d rather save money to buy a new laptop than pay half of the laptop’s value for a new display.
Hi Roajah, thanks for the comment. I’m glad you find your way to deal with this issue. Personally, I haven’t noticed any change to the colors of the display after removing the AR coating using the baking soda method. The only downside is the higher reflectivity. Anyways thanks for the tip about changing the color profile of the display, maybe someone will have a similar issue as you had.
THIS WORKS! Fantastic! thank you so much!! <3
*EDIT: This is a great technique for removing the AR coating, BUT it has altered the colour profile of my screen. the dark tones now have a green hue to them, which isn’t ideal if you’re in any form of visual arts job. Luckily, this laptop is only my secondary back-up computer which I use for emergencies and data mining, so it doesn’t really bother me. But be warned that this can happen
Hi Jon, could you tell us what model of Macbook Pro you have? And what method of removing the anti-reflective coating did you use so that others know what to avoid? Thanks! Jakub
Thank you so much for sharing this method Jakub! I thought the only way to resolve my terrible screen was to replace it. You shared your experience and saved me $800! My screen looks perfect now. Thank you Jakub!!
Hi Brad, doing it this way can certainly save a lot of money and time waiting for it to be fixed!
This is brilliant!!!
I was about to go get listerine, but fortunately I came across your info before! It worked like a charm, but I would like to point a couple of things.
The water measure don’t seem to matter that much as long as you keep the solution with paste consistency for the soda to work as an abrasive. And yeah, I also have the green hue in my dark colours. I have change the monitor calibration to equalise a bit, but I have don’t know what sort of impact i’m about to have when editing my pictures.
Worked for me too, thanks so much for taking the time to document this
Hi Paul, thank you for the comment, I’m glad it helped!
Hi Jakub will this method okay for macbook pro 2012? Thanks in advance!
I personally did it ony my 13 inch Macbook Pro (2013), but in my opinion it should work on the 2012 as well.
If you want to make sure that it works, use a just a little of the baking soda solution on the edge of your display, in case it works than proceed with the rest of the display. Hope this helps! Jakub.
Hi Jakub,
Thank you so much for sharing this. This is a live saver! Just finished doing my Mac and it looks great now!
Hi Dalia, I’m glad to hear it!
It worked! Took me 20 minutes too. I found that a cloth took longer than just using my fingers with the paste. I used the cloth to polish it afterwards. I had to use a little more pressure than I would have liked but, it came off and the screen still works! Thanks for the tip!
I’m glad it worked! Jakub
Thank you thank you thank you!
Took about twice as long for my 2014 MBP, but so worth it..
You are welcome :). Jakub
Hi Jakub,
Thx a lot for your guide. It worked perfectly for me. What means I do not have a reason to replace my mid 2014 MBP 15″. Yea, OK I’ve got one … M1 😀 Waiting for Windows virtualization …
Have a nice life!
Hi Lech, thank you for the kind words! I’m glad I could help! Well, I’m still rocking my good old MBP 13″ 2013 (the one you can see in the pictures above), which is becoming painfully slow, for my video, photo, and music production. The Macbook Air with the M1 certainly seems like a device with an excellent price-performance ratio. When I have saved up enough for it, I’ll certainly buy one! Have a great life too!
holy hell 3 minutes of baking soda and just a little baby wipe and i got a new screen … AR poor in the sun AR poor without but holy mother after removing the AR i got a new computer thanks so much. I never leave comments on these forums. but this got me so damned hyped up thank you so much
Thanks! This worked great on my 2013 13″ Retina. I got tired of using a cloth so I used a buffer with baking soda and it worked well.
thank you so much worked like a charm. I used baking powder instead of banking soda and it worked perfectly. Thought I will let others know that it is ok to use baking powder.
Hi, Jessica! Thanks for the feedback! Yes, that makes sense since, from what I know, baking powder does contain baking soda as well, so it should be a viable option.
Thank you very much! worked perfectly on my MacBook Pro (15-inch, Mid 2015). Although I ignored his advice about “don’t perform the procedure if it’s just for aesthetic reasons”. My slight TOC reached very high limits looking every day at my stained screen.
Anyway, I would like to thank you for taking the time to build this tutorial and send my greetings here in Brazil.
Thank you for the comment Emerson, I’m glad I could help! :).
In time: TOC is in portuguese. the correct in english is OCD… 😉
Worked perfectly but you have to rub quite hard.
Thanks a lot
Great! I’m glad I could help!
Brilliant! Thank you. My screen has been bothering me SO MUCH for over a year. It took a bit of elbow grease but so worth it. There is still a tiny tiny strip (about 2mm wide) where I struggled to get into the edges. I will tackle that later with a q-tip and alcohol. Unless someone has a better suggestion! I feel like I have a new laptop 🙂
i want to thank you for this post. This solution really worked like charm. I had seen solutions of using Listerine however that did not work and finally I came across this and it was indeed a real wonder. The screen looks brand new. i wish i had taken pics of before and after to post them here but missed doing that. cheers.!
Thank you for the kind words! I’m glad we could help :).
I remember the first anti-glare “coatings”. They were just a fine nylon mesh stretched over the front of the CRT. They cut down on the glare but also made the screen duller and harder to read. Most of use chose the brighter/sharper image without the mesh. We had to angle the screens away from bright lights, but it was a small price to pay.
I’ve often wondered what a MacBook would look like without the anti-glare coating. I know the new coatings are a vast improvement over the original meshes, but do they still make things duller and fuzzier? I’m still not sure, but I can say that the screen looks stunning without its coating. Might or might not be better than new, but a vast improvement over the damaged coating.
Thank you for posting these instructions. They worked exactly as described and in just a few minutes my screen went from spotty to spectacular. I might keep the beast a bit longer now that I like it again 🙂
Hi, Richard. Thanks for the comment. I’m glad you found these instructions helpful :).
thanks! after: listerine, isopropyl alcohol and acetone (disastrous)… this worked great! thanks a lot for sharing!
Hi, Andrea! I’m glad this article has helped you! Using baking soda is the safe bet in this case for sure :). Have a nice day!
Hey Jakub, greetings from India… You’re solution worked like a charm. Although it took me about 45 mins.. But it definitely cleared it all up.. You just saved me 500 dollars.. People like you is the reason for good in the world. Thanks a million once again.
Hi Sharang, encouraging words like yours are the fuel that motivates me to grow this blog ????! Thanks for the kind words, it means a lot!
I’ve struggled with my screen for such a long time and finally took the plunge to get the anti-glare coating professionally removed.
I stumbled across your page today and simply thought “I trust him”.
Off I went to the store, paid £1.30 for some baking soda, and twenty minutes later my screen hasn’t been this clear for YEARS.
Thank you for explaining the process, being fair and balanced e.g. reasons to remove / keep the anti-glare and making me trust someone with my beloved MacBook Pro!
You’ve also saved me £200!
Thank you so much & stay safe.
Hi Kel! You are more than welcome, I’m glad I could help.
Unbelievable. This worked so well, I’m amazed. My mid 2015 now looks bright as new. Given the choice between giving my laptop to Apple for a month so they can replace with a non-reflective coating which may or may not need replacing in a year or to anyway, or spending twenty minutes doing this carefully and getting stunning results, the choice is simple. Thank you thank you thank you…
Yep, from my experience, it’s just a matter of time until it happens again. I’m glad you found my method useful :).
AMAZING! I’ve been shopping for new laptops because of how awful my screen was.. Found your link/website and tried it out and worked amazing!! Instructions were super easy to follow and the pictures that went along with them were super helpful. I’m so upset I didn’t take my own before and after pictures because that’s how great this worked!! Thank you!
Hi and thanks for the tip. In your list you have MacBook Pro (15-inch, Mid 2015),
Will your tip also work with my MacBook Pro (Retina, 15-inch, Mid 2015) model.
Or are all 2015 15″ Macbook Pros Retina models?
Hi Jokke, yes, in the article, I’m referring to the retina models!
Mr. Jakub,
This simple solution of your have worked a magic on my MacBook Pro (2013). I thank you from the bottom of my heart for this selfless service. I really love this PC and it has been 8 years since I have it. I thought that I had to either change the screen or the PC itself. but I think this will keep me going for few more years I guess.
I once again thank you for your solution.
Kindest regards,
Pramod V
Hi Pramod! Thank you for the kind words, I’m glad you found this article helpful :).
I am thrilled… this worked out great, and frankly, the AR was becoming really annoying as you could see the splotches and marks when you used the computer, and even more when it was off!
I was afraid to do this, but the pain was far worse than the cure, and the result is magic!
I tried the Listerine method on a portion of the screen, and it worked, but I was afraid of a possible chemical reaction. Baking soda is simple and safe!
Thanks again for your research and time!
Hi Mike, I’m glad it worked for you :).
I took the leap of faith and followed Jakub’s directions; however, I did use a bit more baking soda and a little less water to get the right paste consistency. My results are incredible. My screen (which was a total mess) is now brand new. I’m so proud of myself since I saved myself from buying a new laptop just because of the yucky screen. Thank you so much for providing the correct solution to this Macbook problem. Additionally, your use of the Mohs scale further convinced me to try your method; it made total sense. Thanks again.
Hi Christine, I’m glad I could help. Thank you for the kind words!
Thank you for the advise! I used your baking soda method. It works pretty good! Its going to take allot of scrubbing though so plan ahead.i took about 30-45
Hi Carlos! I guess it depends on how much wear the anti-reflective coating has. For me, it literally took around 10 minutes total, but my screen was pretty bad.
Thank you very much. Our 2014 MacBook Pro 13 retina screen looked like a total mess. It was embarrassing to use in front of other people. Your instructions worked a treat, the screen looks bright, clean and amazing. thank you.
Hi Dane, I’m glad you found this article helpful :).
Just the best! Thank you. I went from total asshole ruining dad’s machine to nobody caring whatsoever. 100!
Hi Jakub. I own a MacBook Pro 13″ Retina (Early 2015) model and I came across your article after doing some research on the anti-reflective coating issue. I mostly used my rMBP in clamshell mode at home while connected to an external monitor while using a seperate magic keyboard and mouse, with the occasional need to take the rMBP with me for work on client sites. So I never really used the built-in keyboard that often, and therefore never noticed any screen smudging or stain issue… until today. A few months ago I purchased an iMac and consequently stored my rMBP away under the bed for those few months. I’ve never done this before. Just tonight I pulled my rMBP from under the bed and opened up the laptop. I was horrified to see for the first time what looks like finger oil marks from the keyboard all over the screen. There aren’t many marks, but there’s enough of them to be annoying. So I’m now contemplating following your instructions to use baking soda to remove the anti-reflective coating, but I’m hesitant because of the potential for high reflectivity in certain lighting conditions. I’ve read many users in the comments section reporting that the screen looks amazingly clear, so this gives me hope. And I mostly use the rMBP indoors and as much away from the glare of light through windows where possible, so I’m assuming the reflectivity shouldn’t be too much of an issue?
But I also want to thank you for writing this well-written article, as I initially thought I had to either live with the problem or be prepared to pay for a replacement screen. But removing the anti-reflective coating instead seems like a good option.
Hi Nigel! Thanks for the question :). It seems like it’s getting to you, but trust me, I really think it’s nothing to lose sleep over. If you don’t use your MBP often, you may leave it as is, in the end, the screen is ugliest when it’s turned off, and we never really look at it like that. If having a clear display is critical for your work, then it might be worth considering removing the coating. Whatever you choose in the end, be happy with it ;)!
I confirm, W5 wipes from Lidl work an absolute treat.
Hi, Mike! Thanks for the feedback. I’m glad it worked for you!
Which W5 wipes did you use please – the antibacterial wipes?
2015 MacBook Pro Model 12,1 2.9 GHz Dual-Core Intel Core i5. Was my work machine, and over time, screen was worse and worse, Completely mottled with areas where the antiglare coating had worn off. Finally tried the baking soda, and while it took a bit of elbow grease, worked like a charm. Looks new and shiny and now much more of a pleasure to use!
Hi Mark! That’s great :). I’m glad it worked for you!
Hi Jakub, my MacBook Pro 15″ mid-2014 had the same problem.
I followed your recipe, and cleaned it all.
In my case it took 1h, only some parts of the anti-glare were more tricky to remove.
Now it’s perfectly shiny, thank you for the amazing tip!
I have an early 2015 MBP. The screen had gotten annoyingly and distractingly discolored/hazed/dirty from the failing anti-glare coating. This MBP is my absolute workhorse, after being driven from the Windows world after 30 years by Windows 8. By dumb luck, my first Mac is the best Mac built, I now understand. I cherish it. It runs my consulting firm. This baking-soda solution was elegantly simple and remarkably effective, also easy and quick. WOW. THANKS!
Hi Eric, that’s great to hear! I’m glad I could help!
Hi! My question is, is there any option to actually remove the coating via soda and later on re-applying somekinda anti-reflective option?
Hi, Ana! Yes, there is an option, of using anti-reflective screen protector with similar anti-reflective qualities as th original coating. For more infromation check out the Can the anti-reflective layer be repaired? section of the article. Have a nice day!
Apple refused to replace the screen awhile back and the coating was already getting loose at around 40% of my screen.
Decided to take the jump and really glad I did! The result is really good and the screens looks like new again! Thanks for writing this comprehensive guide!
Hello Jakub, I just did it on my early 2015 MBP 13″ and the result is fantastic !!! Why did I wait so long !!!
Thank you so much.
Unfortunately this didn’t seem to work on my late 2013 15” retina. I wasn’t sure whether you meant baking powder or bicarbonate of soda. So I tried both, but neither worked. I’m not sure what to try next as I feel like I’ve tried everything. I even endured a trip to Lidl to get the W5 wipes, but those didn’t work either.
Hello Mr. Stevens, I’m sorry to hear you’re having a hard time removing the anti-glare coating. I personally used baking soda, which is in other words bicarbonate of soda (or soda bicarbonate). Maybe you could try Mr. Clean Magic Sponge or steel wool (or metal scourer for cleaning dishes) which is as aggressive as I would consider going. What I would do in your situation is try either the Clean Magic Sponge or the steel wool in the corner of the screen to make sure it doesn’t scratch the glass of the screen but only the anti-glare layer, and if the glass holds up well then I would proceed with the rest of the screen.I hope that helps!
I just tried this on a 2015 13″ MacBook Pro and it worked great!! Excellent results. This for sure works, don’t be afraid to try it!! Thanks for the info!
Hi Douglas, I’m glad I could help!
This is amazing! Such an improvement!! Worked beautifully on my 2017 MBP. Thank you!!
Hi Margot, that’s great! Thanks for the kind words!
My MacBook Pro Early 2015 started showing signs of anti-reflective coating wear only recently, as I had it mostly stayed in clamshell mode while connected to a monitor. But this worked a charm!!! Now it looks as good as new, albeit a bit more reflective than when I first bought it, but I don’t really mind.
That’s awesome!I’m glad it worked well!
HI there, thank you for sharing your tip. How long is ‘normal’ to have to rub the screen for with the baking soda? Many thanks, Fiona
Hi Fiona, it depends on how bad your screen is. If the coating is already pretty worn off, it might take just about 10-15 minutes of scrubbing, on the other hand, if your screen doesn’t look too bad or you have a newer MacBook, it might take a bit more time.
Bonjour, j’ai pris très longtemps avant de prendre la décision de faire l’expérience de faire mon écran. Je ne regrette pas d’avoir lu les explications de notre hôte ainsi que les commentaires des participants. Je vous avoue avoir lu sur presque tout les forums parlant du sujet, vous m’avez grandement donner confiance de me lancer. Merci a vous tous et ma satisfaction est très grande.
Salut Michael, je suis heureux d’avoir pu aider avec le problème.
Wow, thank you so much, Jakub. My screen which was so blotchy and hard to see now looks like the awesome MacBook pro retina screen that I was so impressed with when I bought it. I have a Macbook pro retina early 2015 and after only about 10 mins of light rubbing it looks like new.
Hi Michelle, you are welcome :), I’m glad to see so many people this article helped to solved this issue :).
Thank you! My screen looked like cracked ice and now it is smooth and shiny again. Took me about an hour. The edges cost most of the time, especially at the bottom edge where I used tape to protect it(where the word MacBook is printed).
It is a bit scary to do, but your technical analysis of the procedure regarding the Moh’s index convinced me to use your method. Great job 👏🏻
Thanks Martin, I’m glad I could help!
Thanks Jakub. Your gift that keeps on giving. Had the 2.5 Moh baking soad/sodium bicarbonate handy and it worked perfectly on the Early 2015 13″ that I just bought used. The whole screen had severe delamination but cleaned right up in less than 20 minutes. My backup was to use a 3.0 Moh calcium carbonate glass cleaner for an extra bump, but it wasn’t necessary. Rubbing (Isopropyl) IPA alcohol could affect a good anti-glare coating but it is perfectly fine on glass for the timid who fret about using anything abrasive. The baking soda works so well though, why risk the extra rubbing needed with alcohol. That the anti-glare coating rubbed off so easily was an indication that the initial quality of adhesion was poor or that coating had broken down from exposure to UV or heat source. Keyboard was immaculate (hardly any signs of use) so I doubt is was an oily finger issue. Cheers from New Zealand.
Hi Jim, yes, even I was surpised how well the baking soda worked on my screen when I was trying to figure this out!
Thank you so much it worked I was struggling with this issue for years and right now my laptop looks brand-new.
I don’t know how to appreciate you, man.
Best wishes
My Holy Jesus, this worked like Charm. My screen looks brand new. Thanks a million Sir. I have a Mac book Pro early 2015 Retina and I now tempted to sell even higher. How did you this gonna work in the first place. I watched the video with Listerine but it required alot of efforts and patience. But with Baking Soda, It took me just 10mins. Thanks a million
THANK YOU SO MUCH! I have been wanting to buy a new laptop just because of this issue. You saved me from a big purchase. Device looks brand new!
Hi Jade, that’s great, I’m glad I could help!
I confirm, it works perfectly, thank you
i never comment on posts like this but i had to take a few minutes to thank you because ive been struggling with this issue for so long. OMG!
This was almost magical. I watched so many videos and blogs but always found their “solutions” a bit extreme to say the least. I have a few friends who have the same issue, will definitely share this post.
You rock Jakub.
cheers,
Thank Roberto, thanks for the kind words. I’m glad I could help!
Did it – and it all worked perfctly, just as you described!
Thank you so much!
Hi Lion, I’m glad to hear that!
Hello Jakub, I appreciate your dedication to this post, and thank you for your thorough tutorial. I just discovered ‘Staingate’ myself with my out of fix-date mid 2014 15″ model.. I have a question I haven’t seen asked in the comments yet. I’m looking to upgrade to an M1 model and want to trade in this one to Apple, they gave me an appraisal of $480, when I selected ‘poor screen quality’ as a test to see how much it would change, it went down to below $200.. My question, do you know how seriously Apple looks at the anti glare ‘splotching’? Or, maybe a better question, would a screen completely clean and free of anti-glare be considered ‘clean’? Or would that be considered ‘completely gone and screen requires replacing’? I’m asking because I don’t want to go through the trouble of removing it if Apple is going to make the appraisal lower regardless if it’s a few splotches or not there at all.
But will definitely be doing this if I find out Apple accepts a clear, anti-reflective coating-less screen. Thanks again!
Hi, I can’t speak for Apple, but from my experience, I would say that most likely, a macbook without ar coating will be considered damaged, resulting in the lower price offer from Apple.
Great technique! worked very well for me. I was reading the My Retina Display has stain damage Help forum on Apple Community and someone talked about removing the anti glare coating. Found your site and in a few minutes bam! brand new screen. Thank you very much Jakub!
Hi, you are welcome!
It actually worked! I was so scared to scratch the screen but it ended up perfectly. For anybody not US/UK, you can use “sodium bicarbonate” which is readily available in any supermarket, the result is the same (I’m not sure if they are the same thing).
Wow!, just wow! For years I have been looking (or actually trying to not look) at these stains, thinking the only solution was a new screen. Almost wanted to buy a new MacBook, but you saved me here. Screen is looking brand new. Many, many thanks!
Didn’t work for me! It removes the coating extremely slow, if at all. Will give the W5 a chance. Already also tried disinfection wipes, baby wipes. Nothing works. Not very optimistic in my case.
Hi, Mike which model of Macbook do you have?
Thank you so much! Bicarbonate of soda (UK) worked perfectly. I was contemplating getting a new device because of how awful the screen was; also, the dodgy anti-glare also meant that the camera was very blurry. You have saved me a lot of money!
Don’t be too scared to press firmly – no scratches and the screen is just like new – well – new but without the silly coating!
Hi Paul, I’m glad I could help! Have a good one!
This worked perfectly!! Thank you!! MbP2014…now screen looks like new!
I thought my screen was just dirty and wiped it down to no avail. Then, I thought the oil in my fingers was removing whatever residue was on the screen. Of course, that just made it worse. I tried a dot of eyeglass cleaner on a swab in a remote corner and the coating was totally and immediately removed. I’m not ready to go full screen, yet, as the edges are what is mostly affected, but appreciate your post to know hat what is happening is not unique to my Mac.
Hi! Did you use baking soda or baking powder? I know you wrote baking soda, but just wanted to make sure 🙂
Hi Eli! Yes, I really did use baking soda, but I think baking powder could possibly do the job as well, since it does contain some baking soda as well. Have a nice day!
I had previously had good luck using the Clorox Brand Disinfecting Wipes. Some screens cleaned up in a matter of 10-15 minutes, others took up to an hour of careful scrubbing. Today I ran into a screen that would let me remove about 60% of the coating, but no more. I tried denatured alcohol, mineral spirits, and straight acetone. None would work. In desperation, I tried a fresh piece of grade 0000 steel wool just in the corner to see if it would scratch the glass. No scratch, so I tested it on a section of the glass where the coating remained. It took a little more effort than normal, but the Grade 0000 steel wool began removing the remaining coating. It took a grand total of almost 3 hours from start to finish, but I finally got all of the coating removed, and the glass looks like new.
Hi Ruben, thank you for the comment! I agree that steel wool can be effective, but also more of a “last resort” solution to this problem. Have a nice day.
Good Post
Thanks :).
Worked like a charm!
Hi Andy, I’m glad I could help :).
Hey how many minutes does it take for the coat to come off…I cleaned mine and it didn’t come off after 20minutes
Hi, Suaviee! It all depends on the level of wear of the anti-reflective layer, there is no one universal answer.
I have the 2015 Macbook Pro Retina and the screen had pretty much a full outline of the keyboard and trackpad, and I was honestly embarassed by it because to the average person, it looks like you just have a dirty screen. This worked, but took longer than i thought and i ended up doing half the screen at a time. it worked pretty well, i had a few small issues though and they were due to user error so I thought i’d share. I’m really happy with the results because I was going to buy a new one specifically because of the screen.
MISTAKES TO AVOID:
1) Do this on a flat surface. I’m sure thats pretty obvious to most people but i’m a college student and i did this on my bed and i made a huge mess.
2) keep the screen laying horizontal. There were a few times where I was kind of picking it up and doing it as it was sitting upright and it definitely got baking soda into my keyboard, so the keys have been a bit crunchy for the past few days.
Thanks Kuba for the very detailed instructions for this issue. I had the same problem as everyone else did. I assumed what I was seeing on my screen was just oil from fingerprints from my keyboard. Unfortunately when I tried to clean my screen it only made it worse. I followed your plan to a tee, but it was taking so long that I went back to what happened when if first realized I had an issue. I used windex with vinegar which also took a couple of hours of serious elbow grease. It just worked faster than what I was experiencing with the plan you advised. I finally got it done, but it was a long battle and my arms are wrecked. Still, it’s done, and I appreciate your very detailed explanation. Thanks for the work you put in.
Brad
Hi Brad, thanks for the comment I’m glad you were able to find a way to deal with this issue. It surprises me how much time and effort it took you to get it done. I guess apple has to use different types of anti-reflective coating on different models of Macbook.
Didn’t have a chance to try baking soda but instead used plastic polish that was part of a headlight polishing kit I had in the garage. The process went very quickly with little mess and no hazing of the screen when finished. I had previously tried mouthwash but had had no results.
Hello, I saw on the list that this works for a MacBook Pro 13 inch, early 2015 – however, I have a MacBook Pro Retina, 13 inch, early 2015. Do you think this method will work as well? I have been trying to clean it with water and a lint-free cloth and had no idea that there was such a thing as an anti-glare screen. Thanks for your solution! It is greatly appreciated, and I may just try the edge with the baking soda idea to see if it works.
Even though the MacBook Pro (Retina), 13-inch, Early 2015 was not on the list, I finally found a post on here where someone had successfully cleaned their MacBook Pro Retina. I decided to try the glass lens cleaner. I used the cloth that came with the bottle, sprayed some on the cloth and tested a small corner. It worked, so after about 30 minutes of vigorously scrubbing I successfully cleaned mine. It looks brand new! Thanks for the tip!
Yes! worked very well for me too! beautiful crisp new screen! Took me about 30 minutes because that bicarbonate of soda goes everywhere 🙂
After rubbing gently and wiping clean with damp cloth, I went over once again and then cleaned the glass carefully like any other glass surface with window cleaner
2015 Macbook pro
Jakub, thanks so much for publishing this post. I have a Macbook Pro 13″ Retina display 2015 and the screen was getting pretty ugly. Still usable, but not nice to look at, especially when the screen was black. After following the steps in your post (90 minutes from start to finish), the screen came back perfect black, just like in your pictures. You just gave this laptop a new life. Thanks again.
Hi David, I’m glad I could help!
That is awesome! I’m so glad I’ve found this article! Thank you so much! I’ve been using my mac with a horrible screen for several months, and now, after applying the method provided in this article, it feels brand new!
This was very educational and helpful and it worked! So thank you:)
Hi Frida, I’m glad you found it helpful.
Thank you so much for this thorough guide!
Thank you for this wonderful guide. The process worked very well for me on a 15″ MacBook Pro with terrible delamination, the screen looks like a dream now, took a solid 10-15 minutes scrubbing gently, but I never would have intuited this solution and you laid it out so perfectly.
Thank you so much for this fantastic and easy to understand guide! Under 10 mins and my MacBook looks like new! So happy! Thank you, thank you, thank you!
Folks are STILL using your instructions including me just now. Worked like a charm on my badly streaked December 2016 MacBook Pro 13″. As others have said it looks like new now, and for a few dolllars I can get an anti-glare screen off Amazon using the link you provided. Grateful to you for taking the time to post such detailed instructions.
Huge thank you. My screen looks great now, like a new MacBook
I’m “late” but found this working fix (tried some other without success) it took me some hours (think depend on backing soda quality) and still have 2 spot where the coating doesn’t come, but globally satisfied by the method.
Thanks from France